

My husband is the chocolate fiend in the family. Over time, he's developed a taste for finely crafted dark chocolates from companies like Theo, Dagoba, Vosges, Dolfin and Madecasse. But he's never gotten over his love of the mass produced Reese's peanut butter cups. So over the holidays, I thought it might be fun to experiment with a homemade dark chocolate version with a less sugar and more substantial chocolate and natural peanut butter flavor.
Once you start making these, you'll think of plenty of other flavor possibilities. I also made some solid chocolate cups flavored with coffee and another batch flavored with mint. (See them all in the photo above.) Those are much simpler and faster to make since they don't have a separate filling. I'll post the recipe for those next time.
The peanut butter cups are relatively simple to make and don't really even require any baking. You simply melt your chocolate, coat a candy cup with it, fill it with peanut butter filling, flatten that down a bit to make it even, and then finish with more chocolate on top. The only fussy part is applying the chocolate to the candy papers. It takes a little time, but once you taste the end product, you won't ever want to stop.
I used Scharffen Berger's 70% chocolate, MaraNatha Natural No-Stir (to avoid oil separation) creamy peanut butter, and #5 size candy cups — these have a 1 1/4 inch base and 3/4 inch walls. I ended up buying a couple of extra mini muffin pans to use for these because it was so much easier to make them with the candy paper cups sitting in the muffin pan for structure. Even though these papers are a little smaller than a mini muffin, the pan's walls give you needed structure when you put the melted chocolate into the empty papers. You can find several different sizes of candy papers. The #5s were just right for plenty of chocolate and enough height for plenty of peanut butter too. I noticed that the candy papers were a lot cheaper and the package contained a greater quantity of papers for the price, compared to mini muffin baking cups. Since the candy cups don't have to go in the oven, they are probably a little thinner. In Austin, you can find an assortment of sizes at All in One Bakeshop on 183.
As long as you keep these in the fridge, you won't need to temper the chocolate. Professional candy makers temper chocolate (melting it to a specific temperature, 88 to 90 degrees F or 31 to 32 degrees C, so that the chocolate melts but enough of the fat crystals are maintained so that when the chocolate cools, it has that silky smooth texture and won't have any white powdery "bloom"). But I wanted to see if I could get away with keeping it simple and making these without tempering. I followed David Lebovitz's technique for coating the candy papers with melted chocolate and then letting them set in the fridge. It worked perfectly. Once you've tried this, you'll realize the possibilities are endless. (See David's recipe for a salted caramel and peanut version.)
These make great holiday treats and gifts and were very enthusiastically received. So be sure to make plenty. You'll want enough to treat yourself too.
Note: I discovered that the amount of powdered sugar can vary depending on how wet or dry your peanut butter is and how firm you want your filling, so I'm giving you a range here. Try it yourself and see what you like.
Peanut Butter Chocolate Cups
36 ounces Scharffen Berger 70% chocolate
3 cups MaraNatha natural no-stir creamy peanut butter
1 1/2 - 2 cups powdered sugar
2 teaspoons vanilla
1 tablespoon large crystal sea salt
1/2 cup roasted, salted, skinless peanuts, chopped
72 #5 candy cup papers
mini-muffin pans
Start by preparing your pans. Separate the candy cup papers and place them in your mini muffin pan(s).
Chop your chocolate bars into pieces as small as you can get them. I usually find it easiest to melt chocolate in the microwave, but for this quantity of chocolate, it was too cumbersome and didn't melt evenly. So I did it over an improvised double broiler. In a medium or large pan, bring 4-6 cups of water to a boil. Turn it down to a simmer and place a large metal or glass mixing bowl (that is completely dry so that the chocolate won't seize) that will fit on top of the pan without falling into it, over the top. Place your chopped chocolate into the pan and stir it as it begins to melt. This will take several minutes. Once all the chocolate has melted, you can turn the heat off, but keep the chocolate sitting over the hot water as it will keep it melted while you work. 
I used a teaspoon to place a little dab of melted chocolate into each candy paper cup sitting in the mini muffin pans. After I had put a dollop in each one, I went back with the back of the spoon and spread the chocolate around the bottom of the cup and up the sides. Be sure to get the chocolate up the sides as far as you can. When all of the paper cups in the pan are evenly spread, place the pan in the fridge to set up until firm, about 30 minutes. Keep the remaining chocolate over the simmering water to stay melted until you need it for the top coating. Turn the heat back on under the water, if needed, to return it to a simmer, to keep the chocolate melted.
While the chocolate is in the fridge, you can make your filling. In a mixer, combine the peanut butter, powdered sugar and vanilla. Use the lower quantity of powdered sugar to start and decide if you want to add more to firm it up. 
When the chocolate cups are firmed up, remove them from the fridge, and fill them with the peanut butter filling by the spoonful until they are about 2/3 to 3/4 full. You can spray a little cooking spray on the back of your spoon or even on your clean fingers to pat the peanut butter down evenly into the cups. You want it as flat as possible so that the chocolate coating on top will sit evenly.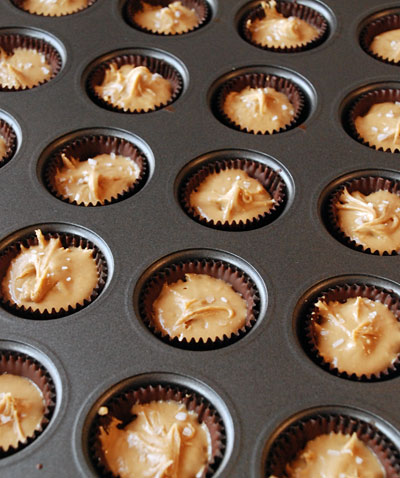
Now sprinkle a few large crunchy crystals of sea salt over the top of the peanut butter filling in each cup. This is really crucial to the flavor, so don't skip this step!
To finish, spoon more melted chocolate over the filling to cover them evenly up to the top. Sprinkle with peanuts. Return to the fridge until set up completely before packaging. Store in the refrigerator. You can remove them from the fridge a few minutes before eating, if you prefer them a little softer.
Yield: approximately 72 cups
Adapted from David Lebovitz.
Jan 9, 2011
Peanut Butter Chocolate Cups
Subscribe to:
Post Comments (Atom)

No comments:
Post a Comment