

Here's the follow-up recipe to the last post on dark chocolate peanut butter cups. Since these are solid chocolate, not filled, they are much faster and easier to make. You melt the chocolate, flavor it, top it, and refrigerate to set. Easy. There are two flavor options below, coffee chocolate cups and mint chocolate cups. There are endless flavor possibilities. Let me know if you come up with one you like. I'm thinking Nutella-filled chocolate cups would be tasty. These make great gifts presented in candy boxes or little cellophane gift bags. Be sure to make extra for yourself. These disappeared from our house pretty quickly.
Since these were solid chocolate, I went with a smaller candy paper cup than for the peanut butter-filled chocolate cups. Make them however you like, just know that you're quantity will be less with larger cups.
I use mini-muffin pans for structure until the chocolate cups have set. Otherwise, the floppy paper cups full of melted chocolate would be a big mess.
Coffee Chocolate Cups:
24 ounces Ghiradelli 60% chocolate chips
2 teaspoons instant coffee crystals
1/4 teaspoon salt
2 tablespoons cocoa nibs (or chocolate-covered cocoa nibs), finely chopped
#4 candy paper cups with 1-inch base
mini-muffin pans
Mint Chocolate Cups:
24 ounces Ghiradelli 60% chocolate chips
2-3 teaspoons mint extract
1/4 teaspoon salt
1 ounce peppermint candy or candy cane, finely chopped
#4 candy paper cups with 1-inch base
mini-muffin pans
Prepare your pans: separate candy papers and place them in the mini-muffin pans. You'll need approximately 24.
Choose the flavor you want to make from the ingredient options above and then proceed...
Melt your chocolate in a double boiler or a saucepan about 1/3 full with simmering water with a large bowl placed over top. Make sure that your bowl is larger than the saucepan and that the bowl is completely dry on the inside (any water droplets will cause the chocolate to seize).
Melt the chocolate in the bowl or double boiler until it melts. Take your time here and stir it occasionally to melt it evenly. When the chocolate is completely melted, remove the bowl from the simmering water. (You can also melt the chocolate in a microwave. I often do this with small quantities of chocolate. But sometimes larger quantities can be harder to get melted all the way through, so you might try it in two batches.)
Stir or whisk in your flavoring (coffee or mint extract) and salt. Stir well to make sure your flavoring is completely incorporated.
Pour the flavored, melted chocolate into the candy papers in mini-muffin pans. I found this easiest to do with a tablespoon.
Sprinkle the tops of your filled chocolate cups with either the cocoa nibs or peppermint candies, depending on which flavor your making.
Place the mini-muffin pan in the fridge for at least an hour to set. Keep refrigerated until ready to serve. You can remove them from the fridge 15 minutes before serving to let them soften just a bit before eating.
Yield: approximately 24 candies per recipe.
Adapted from David Lebovitz.
Jan 16, 2011
Chocolate Cups

Jan 9, 2011
Peanut Butter Chocolate Cups

My husband is the chocolate fiend in the family. Over time, he's developed a taste for finely crafted dark chocolates from companies like Theo, Dagoba, Vosges, Dolfin and Madecasse. But he's never gotten over his love of the mass produced Reese's peanut butter cups. So over the holidays, I thought it might be fun to experiment with a homemade dark chocolate version with a less sugar and more substantial chocolate and natural peanut butter flavor.
Once you start making these, you'll think of plenty of other flavor possibilities. I also made some solid chocolate cups flavored with coffee and another batch flavored with mint. (See them all in the photo above.) Those are much simpler and faster to make since they don't have a separate filling. I'll post the recipe for those next time.
The peanut butter cups are relatively simple to make and don't really even require any baking. You simply melt your chocolate, coat a candy cup with it, fill it with peanut butter filling, flatten that down a bit to make it even, and then finish with more chocolate on top. The only fussy part is applying the chocolate to the candy papers. It takes a little time, but once you taste the end product, you won't ever want to stop.
I used Scharffen Berger's 70% chocolate, MaraNatha Natural No-Stir (to avoid oil separation) creamy peanut butter, and #5 size candy cups — these have a 1 1/4 inch base and 3/4 inch walls. I ended up buying a couple of extra mini muffin pans to use for these because it was so much easier to make them with the candy paper cups sitting in the muffin pan for structure. Even though these papers are a little smaller than a mini muffin, the pan's walls give you needed structure when you put the melted chocolate into the empty papers. You can find several different sizes of candy papers. The #5s were just right for plenty of chocolate and enough height for plenty of peanut butter too. I noticed that the candy papers were a lot cheaper and the package contained a greater quantity of papers for the price, compared to mini muffin baking cups. Since the candy cups don't have to go in the oven, they are probably a little thinner. In Austin, you can find an assortment of sizes at All in One Bakeshop on 183.
As long as you keep these in the fridge, you won't need to temper the chocolate. Professional candy makers temper chocolate (melting it to a specific temperature, 88 to 90 degrees F or 31 to 32 degrees C, so that the chocolate melts but enough of the fat crystals are maintained so that when the chocolate cools, it has that silky smooth texture and won't have any white powdery "bloom"). But I wanted to see if I could get away with keeping it simple and making these without tempering. I followed David Lebovitz's technique for coating the candy papers with melted chocolate and then letting them set in the fridge. It worked perfectly. Once you've tried this, you'll realize the possibilities are endless. (See David's recipe for a salted caramel and peanut version.)
These make great holiday treats and gifts and were very enthusiastically received. So be sure to make plenty. You'll want enough to treat yourself too.
Note: I discovered that the amount of powdered sugar can vary depending on how wet or dry your peanut butter is and how firm you want your filling, so I'm giving you a range here. Try it yourself and see what you like.
Peanut Butter Chocolate Cups
36 ounces Scharffen Berger 70% chocolate
3 cups MaraNatha natural no-stir creamy peanut butter
1 1/2 - 2 cups powdered sugar
2 teaspoons vanilla
1 tablespoon large crystal sea salt
1/2 cup roasted, salted, skinless peanuts, chopped
72 #5 candy cup papers
mini-muffin pans
Start by preparing your pans. Separate the candy cup papers and place them in your mini muffin pan(s).
Chop your chocolate bars into pieces as small as you can get them. I usually find it easiest to melt chocolate in the microwave, but for this quantity of chocolate, it was too cumbersome and didn't melt evenly. So I did it over an improvised double broiler. In a medium or large pan, bring 4-6 cups of water to a boil. Turn it down to a simmer and place a large metal or glass mixing bowl (that is completely dry so that the chocolate won't seize) that will fit on top of the pan without falling into it, over the top. Place your chopped chocolate into the pan and stir it as it begins to melt. This will take several minutes. Once all the chocolate has melted, you can turn the heat off, but keep the chocolate sitting over the hot water as it will keep it melted while you work. 
I used a teaspoon to place a little dab of melted chocolate into each candy paper cup sitting in the mini muffin pans. After I had put a dollop in each one, I went back with the back of the spoon and spread the chocolate around the bottom of the cup and up the sides. Be sure to get the chocolate up the sides as far as you can. When all of the paper cups in the pan are evenly spread, place the pan in the fridge to set up until firm, about 30 minutes. Keep the remaining chocolate over the simmering water to stay melted until you need it for the top coating. Turn the heat back on under the water, if needed, to return it to a simmer, to keep the chocolate melted.
While the chocolate is in the fridge, you can make your filling. In a mixer, combine the peanut butter, powdered sugar and vanilla. Use the lower quantity of powdered sugar to start and decide if you want to add more to firm it up. 
When the chocolate cups are firmed up, remove them from the fridge, and fill them with the peanut butter filling by the spoonful until they are about 2/3 to 3/4 full. You can spray a little cooking spray on the back of your spoon or even on your clean fingers to pat the peanut butter down evenly into the cups. You want it as flat as possible so that the chocolate coating on top will sit evenly.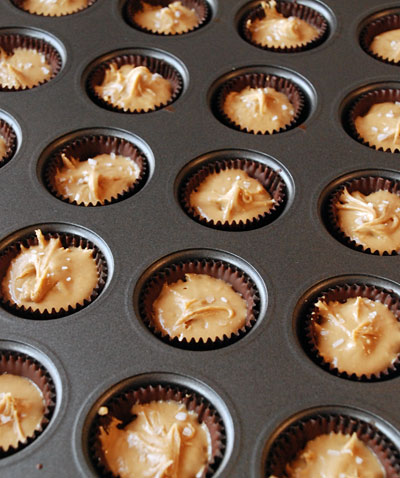
Now sprinkle a few large crunchy crystals of sea salt over the top of the peanut butter filling in each cup. This is really crucial to the flavor, so don't skip this step!
To finish, spoon more melted chocolate over the filling to cover them evenly up to the top. Sprinkle with peanuts. Return to the fridge until set up completely before packaging. Store in the refrigerator. You can remove them from the fridge a few minutes before eating, if you prefer them a little softer.
Yield: approximately 72 cups
Adapted from David Lebovitz.
Dec 6, 2009
Chocolate Almond Toffee

A few years ago, I took a baking class from David Lebovitz when he visited Austin. As expected, everything he made was to die for.
Lebovitz, once the pastry chef at Chez Panisse, now lives and blogs in Paris. He is also hilarious. If you ever get an opportunity to take a class from him, don't miss it. He has written all kinds of books to satisfy your sweet tooth. You know how with some cookbooks, you pick out a recipe here and there to try? But with David's books, you can count on every single recipe being a knock-your-socks off hit. If you only have one book on chocolate or one book on ice cream, they should be his.
I've wanted to make this recipe ever since I took the class. I can't believe it took me this long to try it myself. I love toffee and the combination of buttery toffee with just the right amount of salt to set it off, paired with toasted almonds and chocolate is so simple yet each element enhances the others. The sweet, buttery toffee, the crunch of the salted, roasted almond nuttiness and then the chocolate to bring it all home. Oh yeah.
And even better, this is incredibly easy to make. Just don't get intimated by the need for a candy thermometer. It's only a few ingredients and you can whip up a batch in minutes. Huge return on investment. And this time of year, who am I kidding... ANY time of year, it makes a great gift. Just be sure to package it up quick before you eat it all yourself.
I still had some vanilla sea salt from Boulette's Larder in my baking cabinet, so I sprinkled some on top. You could also use fleur de sel.
This recipe appears in David's ice cream book, The Perfect Scoop, in half this quantity. But if you're going to make it, especially this time of year when you can share it as a gift and be the most popular Santa around, why not make the bigger batch?
Chocolate Almond Toffee
2 cups toasted, salted almonds, chopped
2 tablespoons water
1/2 cup (1 stick) salted or unsalted butter, cut into pieces
a nice, big pinch of salt
1 cup granulated sugar
1/4 cup packed light brown sugar
1/4 teaspoon baking soda
1 teaspoon vanilla extract
1 cup bittersweet chocolate, chopped, or chocolate chips
vanilla sea salt or fleur de sel
cooking spray or silpat
candy thermometer
Line a baking sheet with your silpat nonstick mat, parchment paper or spray it with vegetable oil.
Put 1 cup of the almonds on your prepared baking sheet in a single layer forming a rectangle about 8x10 inches. Set aside.
Measure out the baking soda and vanilla and have them sitting next to the stove.
Put the water, butter, salt and sugars into a heavy-bottomed saucepan and stir together. Heat over medium flame until the candy thermometer reaches 300 degrees. Stir as little as possible during heating. When you reach the magic 300 degree mark, remove pan from the heat and stir in the vanilla and baking soda immediately.
Move quickly here... then pour the hot toffee evenly over the almonds on your baking sheet.
Then sprinkle your chocolate evenly over the top of the hot toffee in the pan. Let sit for several minutes to melt.
While you're waiting for the chocolate to melt, you're going to spy the toffee pan with it's bits of toffee turning into concrete and thinking what fun that's going to be to clean up. But take this tip from David: fill the pan with water and put it back on the heat and bring it to a boil. Turn off the heat and let sit until the candy bits melt and then clean up is a breeze.
When the chocolate has melted, spread it evenly over the toffee with an offset icing spatula. Then sprinkle the top with fleur de sel and the remaining almonds — pressing lightly so they'll stay put in the chocolate.
Let cool completely until the toffee becomes solid and the chocolate sets up. Then you can chop it or break it into shards.
Wrap it up in cellophane bags with some pretty ribbon to give as gifts or serve it yourself crumbled over ice cream. To die for!!!
Adapted from David Lebovitz.
Check out David Lebovitz blog here.
Check out his schedule here to find out when you can take a class from him.
Check out his books here.
