

Here's my favorite new cookie recipe to wish you belated happy holidays. I can't seem to stop making these. They are the perfect winter cookie spiced with warming ginger and cinnamon. They are tender, soft and cakey on the inside with the slightest snap of a crust on the outside.
The original (gluten) recipe comes from Chez Panisse. But I spotted Shauna's gluten-free version on her site, Gluten-Free Girl and the Chef and was inspired, as I am by so many of her posts and recipes, to try them. I love that they don't contain any xanthan or guar gums, commonly found in most gluten-free recipes, each of which have adverse effects on me.
I started with Shauna's version and then began experimenting. First, I traded the butter for coconut oil, and used mostly maple syrup with a little brown sugar instead of the white sugar. And I also tried it with brown rice flour and chia instead of the white rice flour.
These cookies are addictive and the perfect accompaniment for a cup of hot tea, eggnog or horchata. They also make a great whoopie pie, sandwich cookie or ice cream sandwich. I made a whoopie pie for the photo with an eggnog filling (1 1/2 cups powdered sugar and 2 tablespoons eggnog. If you're going dairy-free, try a nondairy eggnog or rice milk-based horchata). But I most like to eat them on their own. Straight, simple, comforting. And I must mention, if you have an unhappy tummy, the ginger in these will make you feel much better. Rx: cookie!
I've been making double batches of these and keeping the dough in the freezer. I bake up a cookie sheet full at a time for fresh hot cookies on demand. (I have to confess to eating the occasional dough ball straight from the freezer and in the heat of summer, I find them particularly refreshing that way.)
Plan ahead, these need to go into the freezer for several hours or overnight. But you can make them like I do and keep the dough in the freezer for cookies anytime. I use a #40 ice cream scoop from the restaurant supply shop to make even, perfectly round cookies. These scoops are inexpensive and seem to be more sturdy than most others that I've used.
Happy baking to all and to all a good night! And a big thank you to Shauna for turning me on to these incredible cookies!
Ginger Cookies
1 1/2 cups sorghum flour
1 1/2 cups brown rice flour
2 tablespoons ground chia seeds
2 1/2 teaspoons baking soda
1/2 teaspoon salt
2 1/2 teaspoons cinnamon
3 teaspoons ground ginger
1 cup coconut oil, room temperature
3/4 cup maple syrup
1/4 cup brown sugar
2 eggs
1 teaspoon vanilla
1/4 cup molasses
Measure out the flours and combine them in a medium-sized bowl. Add the chia, soda, salt, ginger and cinnamon. Whisk together to combine well. Set aside.
In a large mixing bowl, combine the coconut oil, maple syrup and brown sugar. With a mixer, (I used a hand mixer), cream together. Add the eggs, vanilla and molasses, and mix again until evenly incorporated.
Add the flour mixture, half at a time and mix until completely incorporated.
Transfer the dough to a covered container and put into the freezer overnight or for several hours.
Before baking, preheat oven to 350 degrees F. Remove the dough from the freezer and using a #40 ice cream scoop, make as many dough balls as you want to bake. Place the dough balls on a silpat- or parchment-lined baking sheet and return the sheet to the freezer, while the oven warms up. When the oven is ready, move the cookie sheet from the freezer straight into the oven. Bake for 12 minutes. The cookies will look just slightly underdone when you remove them from the oven, but they will continue cooking on the sheet until they cool. Let cool completely on the sheet to firm up (or they'll stick and fall apart).
I think these have the best texture when eaten the same day or the next day after baking.
Note: once the dough has frozen, you can also scoop out your dough balls and freeze them in a covered container or ziptop bag for faster baking later on. Just remember to bake them straight from the freezer to hold their round shape.
Enjoy!
Adapted from Chez Panisse and Gluten-Free Girl and the Chef.
Dec 27, 2011
Gluten-Free and Dairy-Free Ginger Cookies
Nov 19, 2011
Thanksgiving Side Dish Ideas
I've been away too long. Will be back soon with more on our trip to Bend, Oregon and the recipe for the granola bars we made to take with us. They make great road snacks.
But this week, all anyone is thinking about is Thanksgiving. Here are a few side dishes and my favorite pecan pie from the archives to give you some ideas. A few of these are recipes I posted before going gluten-free. Easy substitutions are listed to adapt them to be gluten free.
Roasted Butternut Squash with Cinnamon Chipotle Butter
Google Grain (or Rice) Salad
(You can make this one gluten-free by substituting a wild rice blend for the mix of grains and cooking the rice for 50 minutes.) This dish was a big hit at the PhotoMuse photo workshop pot luck recently.
Squash stuffed with pistachios, feta, and herbs
Roasted Carrots and Parsnips with Sage
Beecher's Macaroni & Cheese
(You can make this one gluten-free by substituting sorghum or brown rice flour for the flour in the cheese sauce and using gluten-free pasta.)
Green Beans with Parsley, Almonds, Sesame Seeds and Goat Cheese
Pecan Pie from the Park Cafe near Glacier National Park, Montana
(Make this one gluten-free with a gluten-free pie crust.)
Happy Thanksgiving!
Feb 11, 2011
Valentine's Treat Ideas

I have Valentine's in my blood. Literally. My great grandparents last name was Valentine. My great grandmother was Ruby Valentine, no less! I almost got named Valentine as my first name. Dodged a bullet there. But I've always thought it would have made a great middle name.
This time of year, I hear lots of folks complaining about the commercialism of what have come to feel like manufactured holidays. But it's easy spread a little heartfelt affection, whether you're treating a friend, a sweetie or yourself, with some homemade goodness. These treats are all gluten-free so they are safe for everyone. Share the love!
Chocolate Cups flavored with coffee or peppermint (gluten-free)
Peanut Butter Chocolate Cups (gluten-free)
Chocolate Almond Toffee (gluten-free)
Chocolate Almond Bars (gluten-free)
Brownies (gluten-free)
Jan 16, 2011
Chocolate Cups

Here's the follow-up recipe to the last post on dark chocolate peanut butter cups. Since these are solid chocolate, not filled, they are much faster and easier to make. You melt the chocolate, flavor it, top it, and refrigerate to set. Easy. There are two flavor options below, coffee chocolate cups and mint chocolate cups. There are endless flavor possibilities. Let me know if you come up with one you like. I'm thinking Nutella-filled chocolate cups would be tasty. These make great gifts presented in candy boxes or little cellophane gift bags. Be sure to make extra for yourself. These disappeared from our house pretty quickly.
Since these were solid chocolate, I went with a smaller candy paper cup than for the peanut butter-filled chocolate cups. Make them however you like, just know that you're quantity will be less with larger cups.
I use mini-muffin pans for structure until the chocolate cups have set. Otherwise, the floppy paper cups full of melted chocolate would be a big mess.
Coffee Chocolate Cups:
24 ounces Ghiradelli 60% chocolate chips
2 teaspoons instant coffee crystals
1/4 teaspoon salt
2 tablespoons cocoa nibs (or chocolate-covered cocoa nibs), finely chopped
#4 candy paper cups with 1-inch base
mini-muffin pans
Mint Chocolate Cups:
24 ounces Ghiradelli 60% chocolate chips
2-3 teaspoons mint extract
1/4 teaspoon salt
1 ounce peppermint candy or candy cane, finely chopped
#4 candy paper cups with 1-inch base
mini-muffin pans
Prepare your pans: separate candy papers and place them in the mini-muffin pans. You'll need approximately 24.
Choose the flavor you want to make from the ingredient options above and then proceed...
Melt your chocolate in a double boiler or a saucepan about 1/3 full with simmering water with a large bowl placed over top. Make sure that your bowl is larger than the saucepan and that the bowl is completely dry on the inside (any water droplets will cause the chocolate to seize).
Melt the chocolate in the bowl or double boiler until it melts. Take your time here and stir it occasionally to melt it evenly. When the chocolate is completely melted, remove the bowl from the simmering water. (You can also melt the chocolate in a microwave. I often do this with small quantities of chocolate. But sometimes larger quantities can be harder to get melted all the way through, so you might try it in two batches.)
Stir or whisk in your flavoring (coffee or mint extract) and salt. Stir well to make sure your flavoring is completely incorporated.
Pour the flavored, melted chocolate into the candy papers in mini-muffin pans. I found this easiest to do with a tablespoon.
Sprinkle the tops of your filled chocolate cups with either the cocoa nibs or peppermint candies, depending on which flavor your making.
Place the mini-muffin pan in the fridge for at least an hour to set. Keep refrigerated until ready to serve. You can remove them from the fridge 15 minutes before serving to let them soften just a bit before eating.
Yield: approximately 24 candies per recipe.
Adapted from David Lebovitz.
Jan 9, 2011
Peanut Butter Chocolate Cups

My husband is the chocolate fiend in the family. Over time, he's developed a taste for finely crafted dark chocolates from companies like Theo, Dagoba, Vosges, Dolfin and Madecasse. But he's never gotten over his love of the mass produced Reese's peanut butter cups. So over the holidays, I thought it might be fun to experiment with a homemade dark chocolate version with a less sugar and more substantial chocolate and natural peanut butter flavor.
Once you start making these, you'll think of plenty of other flavor possibilities. I also made some solid chocolate cups flavored with coffee and another batch flavored with mint. (See them all in the photo above.) Those are much simpler and faster to make since they don't have a separate filling. I'll post the recipe for those next time.
The peanut butter cups are relatively simple to make and don't really even require any baking. You simply melt your chocolate, coat a candy cup with it, fill it with peanut butter filling, flatten that down a bit to make it even, and then finish with more chocolate on top. The only fussy part is applying the chocolate to the candy papers. It takes a little time, but once you taste the end product, you won't ever want to stop.
I used Scharffen Berger's 70% chocolate, MaraNatha Natural No-Stir (to avoid oil separation) creamy peanut butter, and #5 size candy cups — these have a 1 1/4 inch base and 3/4 inch walls. I ended up buying a couple of extra mini muffin pans to use for these because it was so much easier to make them with the candy paper cups sitting in the muffin pan for structure. Even though these papers are a little smaller than a mini muffin, the pan's walls give you needed structure when you put the melted chocolate into the empty papers. You can find several different sizes of candy papers. The #5s were just right for plenty of chocolate and enough height for plenty of peanut butter too. I noticed that the candy papers were a lot cheaper and the package contained a greater quantity of papers for the price, compared to mini muffin baking cups. Since the candy cups don't have to go in the oven, they are probably a little thinner. In Austin, you can find an assortment of sizes at All in One Bakeshop on 183.
As long as you keep these in the fridge, you won't need to temper the chocolate. Professional candy makers temper chocolate (melting it to a specific temperature, 88 to 90 degrees F or 31 to 32 degrees C, so that the chocolate melts but enough of the fat crystals are maintained so that when the chocolate cools, it has that silky smooth texture and won't have any white powdery "bloom"). But I wanted to see if I could get away with keeping it simple and making these without tempering. I followed David Lebovitz's technique for coating the candy papers with melted chocolate and then letting them set in the fridge. It worked perfectly. Once you've tried this, you'll realize the possibilities are endless. (See David's recipe for a salted caramel and peanut version.)
These make great holiday treats and gifts and were very enthusiastically received. So be sure to make plenty. You'll want enough to treat yourself too.
Note: I discovered that the amount of powdered sugar can vary depending on how wet or dry your peanut butter is and how firm you want your filling, so I'm giving you a range here. Try it yourself and see what you like.
Peanut Butter Chocolate Cups
36 ounces Scharffen Berger 70% chocolate
3 cups MaraNatha natural no-stir creamy peanut butter
1 1/2 - 2 cups powdered sugar
2 teaspoons vanilla
1 tablespoon large crystal sea salt
1/2 cup roasted, salted, skinless peanuts, chopped
72 #5 candy cup papers
mini-muffin pans
Start by preparing your pans. Separate the candy cup papers and place them in your mini muffin pan(s).
Chop your chocolate bars into pieces as small as you can get them. I usually find it easiest to melt chocolate in the microwave, but for this quantity of chocolate, it was too cumbersome and didn't melt evenly. So I did it over an improvised double broiler. In a medium or large pan, bring 4-6 cups of water to a boil. Turn it down to a simmer and place a large metal or glass mixing bowl (that is completely dry so that the chocolate won't seize) that will fit on top of the pan without falling into it, over the top. Place your chopped chocolate into the pan and stir it as it begins to melt. This will take several minutes. Once all the chocolate has melted, you can turn the heat off, but keep the chocolate sitting over the hot water as it will keep it melted while you work. 
I used a teaspoon to place a little dab of melted chocolate into each candy paper cup sitting in the mini muffin pans. After I had put a dollop in each one, I went back with the back of the spoon and spread the chocolate around the bottom of the cup and up the sides. Be sure to get the chocolate up the sides as far as you can. When all of the paper cups in the pan are evenly spread, place the pan in the fridge to set up until firm, about 30 minutes. Keep the remaining chocolate over the simmering water to stay melted until you need it for the top coating. Turn the heat back on under the water, if needed, to return it to a simmer, to keep the chocolate melted.
While the chocolate is in the fridge, you can make your filling. In a mixer, combine the peanut butter, powdered sugar and vanilla. Use the lower quantity of powdered sugar to start and decide if you want to add more to firm it up. 
When the chocolate cups are firmed up, remove them from the fridge, and fill them with the peanut butter filling by the spoonful until they are about 2/3 to 3/4 full. You can spray a little cooking spray on the back of your spoon or even on your clean fingers to pat the peanut butter down evenly into the cups. You want it as flat as possible so that the chocolate coating on top will sit evenly.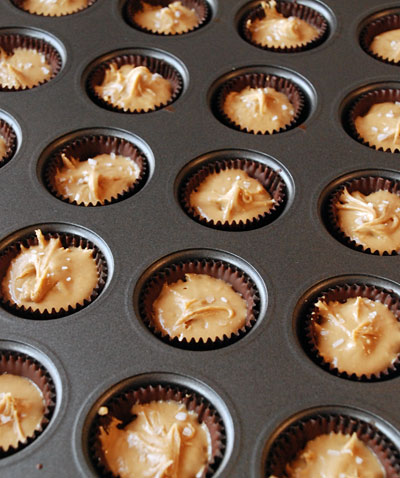
Now sprinkle a few large crunchy crystals of sea salt over the top of the peanut butter filling in each cup. This is really crucial to the flavor, so don't skip this step!
To finish, spoon more melted chocolate over the filling to cover them evenly up to the top. Sprinkle with peanuts. Return to the fridge until set up completely before packaging. Store in the refrigerator. You can remove them from the fridge a few minutes before eating, if you prefer them a little softer.
Yield: approximately 72 cups
Adapted from David Lebovitz.
Nov 24, 2010
Pumpkin Smoothie

I've been craving some of the flavors of fall — pumpkin, nutmeg, and cinnamon, but wanted a healthy way to indulge. So instead of pie, I tried this pumpkin smoothie. It's satisfying and guilt free. And it makes a quick breakfast or snack to keep you going through the grocery shopping, prep and cooking for the big feast tomorrow.
I've made it with plain canned pumpkin and then added spices and some agave for sweetness and I've also tried it with canned pumpkin pie filling for a quicker version. That one already has the spices and sweetener added, so it's a little quicker. But I prefer to use the plain pumpkin and add my own level of sweetness and spice. Add as much or as little of whichever spices you like. You could also sub milk or rice milk for the almond milk I used, but I like the little bit of almond in it. A banana adds creaminess. And I've tried this with a little almond butter, which has a more pronounced flavor, or silken soft tofu, to add some protein. Experiment with it and make it how you like. I like it icy cold, so add ice at the end, or refrigerate the pumpkin, tofu and almond milk before blending.
I haven't tried this yet, but it would probably also freeze into popsicle molds for tasty frozen treats. Since temps are still in the upper 80s here, that's sounding pretty good about now. Bring on the cold fronts!
Happy Turkey Day! (Links below to some Thanksgiving feast favorites.)
Pumpkin Smoothie
1 cup canned pumpkin purée
1/4 - 1/2 cup silken soft tofu
1/2 banana
3/4 cup vanilla almond milk
1 - 2 tablespoons agave
1/2 teaspoon cinnamon
1/4 teaspoon allspice
12 grates of fresh nutmeg
pinch salt
Combine all ingredients in a blender and whiz until well combined. If desired, add ice and blend again until smooth.
Makes one large or two small servings.
More Thanksgiving recipes:
Pecan pie
Pecan pie bars
Stuffed squash
Roasted carrots and parsnips with sage
Roasted butternut squash with cinnamon chipotle butter
And for the day after... this soup would also work very well with leftover turkey:
Smoked chicken, mushroom and wild rice soup
May 2, 2010
Al Pastor Tacos for Cinco de Mayo

Cinco de Mayo (the 5th of May) is coming up and in Austin, that's a good excuse for a Mexican feast. The holiday celebrates the Mexican army's win over the French in a battle in 1862. In the U.S., especially Texas, it's a celebration of Mexican heritage.
Pork al pastor is traditionally cooked on a rotisserie like a Middle Eastern shawarma. It's roasted with a piece of pineapple on top to baste it as it cooks. The best al pastor has tender, juicy meat with crispy, lacquered outside bits. My favorite part of al pastor is that texture paired with the distinct flavor of pineapple.
We've been working our way around town, whenever we hear a tip or recommendation of a good al pastor taco somewhere in Austin, whether it's from a restaurant or a little taco trailer. So far, the best we've tasted have come from Al Pastor on Riverside or Piedras Negras on Cesar Chavez at Pleasant Valley. If you've got a favorite in Austin, leave a comment, we'd love to try it.
But we've also been experimenting at home. I clipped a pork kebab al pastor recipe from the sorely missed Gourmet magazine and we've been tinkering with it as our base. They take boneless pork shoulder, cut it into cubes, skewer it with pineapple and onions, and then grill it with a pineapple basting sauce. It's served with a tangy salsa of roasted tomatoes and onions combined with more of the pineapple basting sauce to form an incredible pineapple salsa.
We've experimented with this recipe quite a bit. We ended up wanting a lot more of the basting sauce and salsa so we've increased those quantities. I like having leftovers of the salsa. It has a bit of vinegar in it which means it keeps well and it's great on grilled fish or even corn tortilla chips. It's incredibly refreshing. As it heats up outside, I start to crave a tangy, zippy, fresh salsa. That's the taste of summer in Austin. And this one has become my favorite.
We've tried making this with different kinds of meat — pork shoulder, which requires a fair amount of prep to cut down into bite-sized cubes and as a shortcut, with big, fat boneless pork chops, which were faster to trim. The pork chops turned out to be too lean though. You need some fat to keep the meat moist so you can blast it a bit at the end to get that crispy texture you want on the outside.
This is a damn fine al pastor. But in the pursuit of perfection, we're going to keep experimenting to fine tune the texture to achieve the crispy edges we're looking for. Next time, we're thinking of trying pork butt instead. We'll debone the roast, slice it open lengthwise to get more surface area and then grill it in a large piece instead of cutting it into chunks. After it's seared on one side, flip it, brush with the basting sauce, then later, flip it again, and baste the other side. When it's cooked through, shred it, then if you like it really crispy, reheat and sear the shredded meat again before serving. A lot of prep, I know. But this is all in the service of a masterpiece. Tonight, we were trying the pork chops, so the meat was cut into small cubes so that it would cook quickly and not dry out. The meat was tender but we think it needs more fat to hold up to the blast of heat it needs to get some good crispy edges.
We also added a bit more chile. We like the smokiness of chipotle, so we used that. Chipotle powder is easy. But if you like some other dried chile, use that. The original recipe called for three dried chiles de arbol. If you use dried whole chiles, you'll want to heat them over medium heat in a dry skillet to toast them about 30 seconds on each side. Also, we have Mexican oregano growing in our garden. It's great for seasoning taco fillings, beans, you name it. You can substitute dried.
Note: Early on, we also tried marinating the meat in the pineapple basting sauce and while it imparts great flavor, the citrus essentially cooks the meat while it's marinating and destroys the texture. It just turns to paste. So don't do that!
Whether you cook it as kebabs, in a big piece and shred it or on a rotisserie, this is some good eating. Serve it on fresh corn tortillas with the pineapple salsa, some cilantro, roasted onions and pineapple and you'll be feasting.
Al Pastor Kebabs
Pineapple Basting Sauce and Salsa
1/2 white onion, peeled and sliced in half
1 + 1 teaspoon chipotle powder, separate
1 whole pineapple, peeled, cored and cut into cubes
1/2 cup distilled white vinegar
4 tablespoons vegetable oil
4 cloves of garlic
2 teaspoons of fresh Mexican oregano
1 teaspoon ground cumin
32 ounces canned fire-roasted tomatoes
6 tablespoons water
1/2 cup chopped cilantro
Broil your onion half on your grill or under the broiler for about five minutes on each side, until it's softened and charred.
While that's cooking, make your pineapple basting sauce. In a blender, combine one teaspoon chipotle powder, pineapple, vinegar, oil, garlic, oregano and cumin. Pour into a bowl and set aside. Hang on to the blender, you're about to use it again. You don't even have to clean it out though.
When the onion has finished roasting, put it in the blender. Add the tomatoes, one teaspoon chipotle powder and water. Blend until smooth. Add cilantro and 3/4 cup of the pineapple basting sauce. Blend again to combine.
For the meat
2 pounds pork shoulder, trimmed and cut into 1 1/2-inch cubes
1 large white onion, peeled and cut into 1-inch pieces
1 fresh pineapple, cut into 1-inch chunks
To serve
chopped fresh cilantro
lime wedges
fresh corn tortillas (approximately 16-20)
Prep your grill (medium-high heat). If you're doing kebabs, toss the pork in the remaining pineapple basting sauce. (Don't do this ahead or it'll ruin the texture of the meat.) Then immediately thread the pork, pineapple chunks and onions alternately on to skewers.
Grill until cooked through about 15 minutes, flipping them over about halfway through.
To serve, steam the tortillas in a damp kitchen towel in a microwave for about 1-2 minutes until steaming. Serve kebabs on the warm tortillas with pineapple salsa, cilantro and lime wedges.
Adapted from Gourmet.
Feb 6, 2010
Super Bowl Snacks
Looking for ideas for Super Bowl snacks? Here are a few from the archives...
Guacamole
Cheese Straws
Brent's BBQ sauce
Roasted Potato Salad
Tacuba Enchildadas
Chocolate Almond Bars
Chewy, Gooey, Chocolate Chip Cookies
Caramel Cake
Amond Butter Crispy Treats
Feb 5, 2010
Toasted Oat and Brown Sugar Milkshake

Hot news: Just found out that apparently, tomorrow, February 6th, is International Ice Cream for Breakfast Day. That's all the excuse I needed to try out a recipe from my new Thoroughly Modern Milkshakes cookbook. Adam Reid, the kitchen equipment specialist from the PBS show, America's Test Kitchen, gives us this "guide to milkshake modernization." Reid does for milkshakes what David Lebovitz did for ice cream in my favorite ice cream book, The Perfect Scoop, providing easy-to-replicate but imaginative flavors that invigorate the taste buds.
Reid covers all the basics and offers many variations on classics like chocolate and coffee combinations for those who want their old favorites, but he takes you much further with combinations like vanilla, honey and sesame; vanilla rum and salted cashew; Mexican chocolate with chipotle and almond; chocolate Guiness, Vietnamese coffee, strawberry basil; blackberry lavender; avocado coconut and lime; peach with brandy and nutmeg; minted cucumber lemon... I could go on and on.
Since tomorrow is ice cream for breakfast day, I wanted to try a shake that combined breakfast flavors in a shake. I narrowed down the contenders to two: toasted oatmeal and brown sugar or maple bacon. I know, bacon is the it girl of food fashion these days, but something about the toasted oats and brown sugar sounded so comforting. So I'll try the bacon shake next time.
I love toasting old-fashioned steel cut oats before cooking them. It really brings out the flavor of the oats and makes them much nuttier. Reid's recipe used a pinch of ground cloves to flavor the shake. I'm not a huge fan of cloves, so I switched to cinnamon. Use what you like. Nutmeg might be good too. And with all the cedar flowing through the air around here, I wasn't looking to add to my nasal challenges anymore, so I made a mostly (except for a teeny bit of butter) nondairy version subbing vanilla almond milk for the milk, and nondairy ice cream (I used vanilla Nada Moo), for the traditional vanilla ice cream.
Results: It was creamy and luscious and by far the best oatmeal anything I've ever tasted. I only made a half recipe version for myself and really regretted that after I finished the photos and had a taste. Wow. I wasn't prepared for it to be that good. It was fun and unexpected and most-of-all, addictive.
This might be fun to serve at a brunch in little shot glasses before the meal. Reid suggests a variation using Scotch and some honey to further elevate the heavenliness of this concoction. That could be even more fun for a special brunch.
Toasted Oatmeal and Brown Sugar Shake
1 tablespoon unsalted butter
1/4 cup thick cut or steel cut oats
2/3 cup + 1/2 cup cold milk (or soy, rice, or almond milk)
2/3 cup water
pinch of salt
3 tablespoons brown sugar
pinch of cinnamon, cloves or nutmeg
8 small scoops vanilla ice cream, softened slightly
First, make your oats...
Melt butter in a small saucepan. Add the oats, stirring continuously, and cook for 5-6 minutes until golden brown. You'll smell their nutty fragrance.
Standing back a bit (it will sputter!), pour in 2/3 cup milk, 2/3 cup water and salt. Bring up to a boil, then lower heat to medium-low and simmer until oats have softened and liquid has been absorbed, about 15-18 minutes. Stir occasionally.
Let cool until room temperature. (I speeded this up by scraping the oats into a small bowl and putting it in the fridge for a few minutes.)
(If you wanted to make this ahead, you could have the oats cooked and in the fridge until you're ready to mix the shake together and serve.)
In a blender, combine 1/2 cup of the cooked oats, 1/2 cup of milk, brown sugar, and your spice of choice, and blend for at least a minute, until oats are completely smooth. Add in the ice cream and pulse to break it up initially. Then blend full speed until well combined.
Pour into cold glasses and serve immediately.
Makes about 3 1/2 cups.
Adapted from Thoroughly Modern Milkshakes by Adam Reid.
Jan 1, 2010
2009 Top 10+ List
As 2009 makes its exit, I wanted to put together a top 10 food list. As I started rounding up candidates, I got carried away and ran over. I think more is better. Enjoy.
And here's to a peaceful, healthy, and happy new year to all!
#1: By far, my biggest new food addiction of the year is Maine Root's Ginger Brew. It's not just a sugary ginger-flavored soda. It's full of real deal spicy ginger and made with organic evaporated cane juice. It's just the right balance of spicy and sweet. It's not just tasty, but it's also very soothing for a tummyache or headache. I can't stop drinking the stuff.
#2: Tacos, tacos, tacos...especially al pastor tacos. We've been trying some of the taco trailers around town and thanks to some tips from my friend and photographer, Matt, and the excellent local blog, Taco Journalism, we've narrowed down our favorite al pastors to these three: La Guera on South Lamar, Rosita's Al Pastor on Riverside, and Piedras Negras (which will forever be called "Not Dos Hermanos" because that's the name Matt introduced me to it with. It sits on the old site of Dos Hermanos) on Cesar Chavez at Pleasant Valley. I'm not sure I could pick a favorite at this point but I'll keep trying. Photo above is of al pastor tacos from Rosita's Al Pastor trailer on Riverside.
#3: Dim sum on the fly from Get Sum Dim Sum. Photo shows my favorite lunch order: steamed veggie dumplings, shrimp and pork shu mai (or chicken potstickers), a bbq pork steamed bun, and a sesame ball to finish. That's our golden retriever, Jasper's, nose in the photo. He likes dim sum too. Their food is fresh, fast and easy. And best of all, there's no MSG. The chef hails from San Francisco's Yank Sing. 
#4: Tam Deli's lemongrass pork banh mi sandwich. There are no words. I could eat this sandwich and drink their limeade every day. Really. Tangy lemongrass pork with fresh pickled carrots, cucumbers and jalapenos with cilantro on a crusty bun. I want one now. 
We also love their shrimp and pork vermicelli bowl and the steamed rice noodle wraps filled with mushrooms and pork and topped with Tam's homemade pork pate and crunchy garlic on top. It's pure comfort food.
#5: Mighty Cone's avocado cone. Hot and steamy avocado with a crust of sesame, almonds, chile and cornflakes. Great street food. I spotted the recipe for their chicken cone in Food & Wine recently. Can't wait to try it at home.
#6: June Taylor's tayberry conserve. Tayberries are a cross between raspberries and blackberries. I've always been a blackberry jam girl, especially on steamy buttermilk biscuits. But June Taylor's tayberry conserve has usurped blackberry of it's highest position. Her pear vanilla butter is another favorite.
#7: Sesame mochi. I had one of these for the first time at 10,000 Waves — a Japanese bath house and spa in Santa Fe. It was the perfect snack after a soak in the hot water. I've been searching for them ever since. Finally found them locally at the Japanese market Asahi Imports. Mochi is wrapped around a sweet red bean paste and then covered in black sesame seeds. These are also considered a good luck treat at New Year's so it's the perfect time to indulge after a bowl of noodles. 
#8: Speaking of noodles... Santa brought me this beautiful rustic donabe, a Japanese ceramic hot pot. Made of porous clay that is partially glazed, it can stand up to high heat and holds that heat evenly for a long time. This one came from Tortoise General Store. Find out more about donabe and hot pot recipes from Harris Salat of the blog, Japanese Food Report and co-author of Japanese Hot Pots.
#9: The first thing I saw as we walked into San Francisco's Ferry Market was Boccalone's pig sign. Tasty salted pig parts indeed. I've never really been a big fan of "cured meats" but now I'm a convert. Their orange and wild fennel salame is my favorite. 
#10: All summer I kept a constant supply of coconut and mango Smooze Fruit Ices in the freezer. All natural and dairy free, these are great treats on their own or in a smoothie. They'll cool you right down after being out in the Texas heat.
#11: Frank hot dogs. From the "jackalope" (rabbit and antelope sausage with huckleberry compote, sriracha aioli and smoked cheddar) to the "Chicago" dog with day glow relish, they've got what you're craving. Take a look at their drink menu too. 
#12: Bi-Rite Creamery's ice cream in San Francisco. It's a good thing I can't get this stuff regularly, I'd be in trouble.
Dec 24, 2009

Dec 18, 2009
Caramel Cake

I clipped this recipe out of Gourmet magazine almost two years ago and ran across it recently. Boy, have I been missing out. This shy little cake sounds good generally, but doesn't seem to shout. But it so deserves to be center stage. It's a soft, moist, cloud-like cake made so very tender and slightly tangy with buttermilk. Top that with a gooey caramel glaze and it becomes transcendent. It's the kind of cake you want to crawl into and roll around and pull around you like a warm quilt on a cold winter day. Like that.
I made this to take to some friends we were having dinner with. It was just the right size for our small group. It bakes in a square cake pan and makes about nine pieces if you cut it squarely.
I thought it was best eaten the day it was made, especially when the caramel glaze is still soft and gooey. The cake is its best that way, still moist and dense. And next time, I think I'll save a bit of the caramel to drizzle over the cut pieces when serving. It would look really pretty that way. Who can resist caramel oozing all over their plate?
Be sure to use cake flour for this so it will be truly tender. And remember to take out your butter and eggs beforehand so they can reach room temperature before you start to mix your batter. The cake needs to cool for an hour before glazing, so plan accordingly.
Caramel Cake
For the cake:
2 cups + 2 tablespoons cake flour, sift before measuring
1 teaspoon baking powder
3/4 teaspoon baking soda
1/2 teaspoon salt
1 stick unsalted butter, softened
1 cup sugar
1 teaspoon vanilla
2 large eggs, at room temperature
1 cup buttermilk, shaken well
cooking spray
parchment paper
For the caramel:
1 cup cream
1/2 cup light brown sugar, packed
1 teaspoon light corn syrup
1 teaspoon vanilla
salt
candy thermometer
Preheat oven to 350 degrees.
Spray an 8- or 9-inch square cake pan with cooking spray and line with a square of parchment paper. Then spray the parchment. Set aside.
Whisk together sifted flour, baking powder, baking soda, and salt. Set aside.
With your mixer, beat together butter and sugar until pale and fluffy. Add vanilla and mix in. Add eggs one at a time, mixing after each. On low speed, add in the buttermilk and mix until just combined. (Gourmet says it may look curdled here, but mine didn't.)
Add flour mixture in three batches, mixing just until each batch is incorporated.
Pour the batter into your prepared pan and tap on your counter to make sure there aren't any air bubbles in the batter.
Bake approximately 35 minutes until a toothpick or cake tester inserted in center comes out clean. Then let cool for at least 10 minutes before removing from pan. (Tip: place a plate or platter over your cake pan, then flip the cake over on to it. Lift the pan off and remove parchment, if necessary. Then you can use another plate to flip it back over on to it's bottom.) Let cool one hour before glazing.
While the cake is cooling, make the glaze.
In a heavy saucepan, combine cream, brown sugar, corn syrup, and a pinch of salt. Bring up to a boil over medium heat. While it's coming to a boil, stir it until the sugar dissolves. Boil until it reaches 210 degrees on your candy thermometer, about 12-14 minutes. Remove from heat and stir in vanilla.
With your cake on your serving platter, gently pour hot caramel over the top of the cake, letting it drip down the sides. I did this a little at a time instead of all at once. I didn't want it just running off completely, so I poured it on a bit at a time to let the glaze cool a little and stay more firmly on the cake. Let cool a few minutes so glaze can set a bit. Or who am I kidding? Cut into that bad boy and get runny caramel all over your face. Just don't burn yourself! It's so good. I dare you to eat just one piece.
Approximately nine servings.
Adapted from Gourmet magazine, January 2008.
