

I love to bake. And I've spent years experimenting with recipes to find the one version of something that stops me in my tracks. The one that means the search is over. The one I will want to continue making forever. Like these chocolate chip cookies. And this shortbread. And this crumble. And these brownies. These are holy grail recipes. I would say that they are the recipes I would grab if the house caught on fire. But I think I know them so well, I wouldn't need to. I've made them so many times I can remember them.
But going gluten-free means redefining those old favorites so that I can still enjoy them. This will take time and experimentation. But I'm working on it. These brownies are the first to go gluten-free. They seemed like a good candidate. They are so easy to make, you don't even need a mixer. They are mostly eggs and chocolate and butter with a little flour to keep it all together. As a gluten-free flour, I used equal parts brown rice flour and tapioca flour. A lot of gluten-free recipes you see have combinations of a long list of alternative flours and even gums to hold things together. You don't have to fuss with all of that here. Just the two flours. One note, though: rice flours can be gritty if they are not very finely milled. I tried several brands. I kept seeing recommendations for Authentic Foods brand rice flours because they are milled superfine. I know, it's an extra step to have to mail order your rice flour, but it's truly worth it to avoid the grittiness. Other alternative gluten-free flours would probably work here as well, but this one works for me. Experiment and let me know what works for you.
These can be made in a square baking pan or as mini or full-size cupcakes. I've made them for several parties as cupcakes. If you're using a square baking pan, be sure to spray it and then line it with a strip of parchment hanging over the sides (seen here) for easy removal from the pan after baking and cooling.
The recipe below is for straight up, traditional brownies. For a spicy Mexican version, you can add 1/8 teaspoon chipotle powder, 1/2 teaspoon cayenne powder and 1 teaspoon cinnamon to the flour and give it some heat. These are my husband's favorite.
Substitutions note: I've also experimented with making these dairy-free, using Earth Balance baking sticks (trans fat free!). I'm hard pressed to tell you which I like better. The margarine gives them a little more chewiness in the texture which I love. But the butter is a little richer. I made batches of each and asked friends to give me a favorite. Even my 13-year-old buddy, Jackson, had a hard time picking a favorite, although he put in a good effort tasting one, then the other, then the first one again... Either way, you'll have fudgy brownies with chewy edges and big chocolate flavor.
Most important note: these are best made the day before serving. They'll be good after cooling from the oven, but the flavors develop overnight. They will be spectacular the next day. So make them a day ahead.
Gluten-Free Brownies
1/2 cup + 1 tablespoon Authentic Foods Superfine brown rice flour
1/2 cup + 1 tablespoon tapioca flour (or tapioca starch, same thing)
8 ounces 60-70% bittersweet chocolate, chopped
2 sticks unsalted butter (1 cup or 228 grams)
4 eggs
1/2 teaspoon salt
1 cup sugar
1 cup brown sugar
2 teaspoons vanilla
Preheat your oven to 350 degrees.
In a small bowl, measure out your brown rice flour and tapioca flour and stir well to combine. (If you're making the Mexican spicy version, add the spices to the flour and stir together.) Set aside.
With softened butter or cooking spray, grease a square baking pan (mine is 9 1/2 x 9 1/2 inches when measured across the top). Now cut a strip of parchment paper or foil a little narrower than the width of the pan and long enough to hang over on both sides. Place the foil/parchment in the pan and press it against the sides. It will stick to the pan. Now grease the paper as well. This seems fussy, but will insure that you get these babies out of the pan in one piece. The overhanging sides will act as a sling to lift out the brownies -- only when they are completely cool! You hear me!
In a cereal or soup-sized bowl, put the chopped chocolate and the butter. Microwave on 50% power in 30-second increments until the butter is completely melted. The chocolate won't look melted, but stir them together and it will melt completely. Set aside.
In a large mixing bowl, whisk or stir together the eggs, salt, sugars and vanilla. (I use a giant whisk for this. Seen here.)
Add the melted chocolate to the egg mixture and whisk/stir together. Add the flour and gently whisk together completely.
Pour the batter into the prepared pan and bake for about 45 minutes, until the top is crackly and shiny. (You want fudginess, so the toothpick test doesn't really work here.) If you make these as mini-cupcakes, bake approximately 20 minutes. For full-size cupcakes, 30-40 minutes, depending on how fudgy you want them.
Let cool completely. COMPLETELY. Then, if you can't stand it, using the sling you made with foil/parchment, lift the brownies out in one piece, slice and eat. But if you are made of stronger stuff than most, cover the cooled brownies in the pan and refrigerate or let sit on a cool counter overnight. The next day, use the sling to remove them, peel off the parchment/foil, slice and enjoy.
From the square pan, these can be cut into 9 giant brownies or 12-16 smaller ones. They are very rich so a little goes a long way. (Yields 12 full-size cupcakes or 24 minis.)
Adapted from David Lebovitz and Nick Malgieri.
Feb 1, 2011
Gluten-Free Brownies

Jan 16, 2011
Chocolate Cups

Here's the follow-up recipe to the last post on dark chocolate peanut butter cups. Since these are solid chocolate, not filled, they are much faster and easier to make. You melt the chocolate, flavor it, top it, and refrigerate to set. Easy. There are two flavor options below, coffee chocolate cups and mint chocolate cups. There are endless flavor possibilities. Let me know if you come up with one you like. I'm thinking Nutella-filled chocolate cups would be tasty. These make great gifts presented in candy boxes or little cellophane gift bags. Be sure to make extra for yourself. These disappeared from our house pretty quickly.
Since these were solid chocolate, I went with a smaller candy paper cup than for the peanut butter-filled chocolate cups. Make them however you like, just know that you're quantity will be less with larger cups.
I use mini-muffin pans for structure until the chocolate cups have set. Otherwise, the floppy paper cups full of melted chocolate would be a big mess.
Coffee Chocolate Cups:
24 ounces Ghiradelli 60% chocolate chips
2 teaspoons instant coffee crystals
1/4 teaspoon salt
2 tablespoons cocoa nibs (or chocolate-covered cocoa nibs), finely chopped
#4 candy paper cups with 1-inch base
mini-muffin pans
Mint Chocolate Cups:
24 ounces Ghiradelli 60% chocolate chips
2-3 teaspoons mint extract
1/4 teaspoon salt
1 ounce peppermint candy or candy cane, finely chopped
#4 candy paper cups with 1-inch base
mini-muffin pans
Prepare your pans: separate candy papers and place them in the mini-muffin pans. You'll need approximately 24.
Choose the flavor you want to make from the ingredient options above and then proceed...
Melt your chocolate in a double boiler or a saucepan about 1/3 full with simmering water with a large bowl placed over top. Make sure that your bowl is larger than the saucepan and that the bowl is completely dry on the inside (any water droplets will cause the chocolate to seize).
Melt the chocolate in the bowl or double boiler until it melts. Take your time here and stir it occasionally to melt it evenly. When the chocolate is completely melted, remove the bowl from the simmering water. (You can also melt the chocolate in a microwave. I often do this with small quantities of chocolate. But sometimes larger quantities can be harder to get melted all the way through, so you might try it in two batches.)
Stir or whisk in your flavoring (coffee or mint extract) and salt. Stir well to make sure your flavoring is completely incorporated.
Pour the flavored, melted chocolate into the candy papers in mini-muffin pans. I found this easiest to do with a tablespoon.
Sprinkle the tops of your filled chocolate cups with either the cocoa nibs or peppermint candies, depending on which flavor your making.
Place the mini-muffin pan in the fridge for at least an hour to set. Keep refrigerated until ready to serve. You can remove them from the fridge 15 minutes before serving to let them soften just a bit before eating.
Yield: approximately 24 candies per recipe.
Adapted from David Lebovitz.
Jan 9, 2011
Peanut Butter Chocolate Cups

My husband is the chocolate fiend in the family. Over time, he's developed a taste for finely crafted dark chocolates from companies like Theo, Dagoba, Vosges, Dolfin and Madecasse. But he's never gotten over his love of the mass produced Reese's peanut butter cups. So over the holidays, I thought it might be fun to experiment with a homemade dark chocolate version with a less sugar and more substantial chocolate and natural peanut butter flavor.
Once you start making these, you'll think of plenty of other flavor possibilities. I also made some solid chocolate cups flavored with coffee and another batch flavored with mint. (See them all in the photo above.) Those are much simpler and faster to make since they don't have a separate filling. I'll post the recipe for those next time.
The peanut butter cups are relatively simple to make and don't really even require any baking. You simply melt your chocolate, coat a candy cup with it, fill it with peanut butter filling, flatten that down a bit to make it even, and then finish with more chocolate on top. The only fussy part is applying the chocolate to the candy papers. It takes a little time, but once you taste the end product, you won't ever want to stop.
I used Scharffen Berger's 70% chocolate, MaraNatha Natural No-Stir (to avoid oil separation) creamy peanut butter, and #5 size candy cups — these have a 1 1/4 inch base and 3/4 inch walls. I ended up buying a couple of extra mini muffin pans to use for these because it was so much easier to make them with the candy paper cups sitting in the muffin pan for structure. Even though these papers are a little smaller than a mini muffin, the pan's walls give you needed structure when you put the melted chocolate into the empty papers. You can find several different sizes of candy papers. The #5s were just right for plenty of chocolate and enough height for plenty of peanut butter too. I noticed that the candy papers were a lot cheaper and the package contained a greater quantity of papers for the price, compared to mini muffin baking cups. Since the candy cups don't have to go in the oven, they are probably a little thinner. In Austin, you can find an assortment of sizes at All in One Bakeshop on 183.
As long as you keep these in the fridge, you won't need to temper the chocolate. Professional candy makers temper chocolate (melting it to a specific temperature, 88 to 90 degrees F or 31 to 32 degrees C, so that the chocolate melts but enough of the fat crystals are maintained so that when the chocolate cools, it has that silky smooth texture and won't have any white powdery "bloom"). But I wanted to see if I could get away with keeping it simple and making these without tempering. I followed David Lebovitz's technique for coating the candy papers with melted chocolate and then letting them set in the fridge. It worked perfectly. Once you've tried this, you'll realize the possibilities are endless. (See David's recipe for a salted caramel and peanut version.)
These make great holiday treats and gifts and were very enthusiastically received. So be sure to make plenty. You'll want enough to treat yourself too.
Note: I discovered that the amount of powdered sugar can vary depending on how wet or dry your peanut butter is and how firm you want your filling, so I'm giving you a range here. Try it yourself and see what you like.
Peanut Butter Chocolate Cups
36 ounces Scharffen Berger 70% chocolate
3 cups MaraNatha natural no-stir creamy peanut butter
1 1/2 - 2 cups powdered sugar
2 teaspoons vanilla
1 tablespoon large crystal sea salt
1/2 cup roasted, salted, skinless peanuts, chopped
72 #5 candy cup papers
mini-muffin pans
Start by preparing your pans. Separate the candy cup papers and place them in your mini muffin pan(s).
Chop your chocolate bars into pieces as small as you can get them. I usually find it easiest to melt chocolate in the microwave, but for this quantity of chocolate, it was too cumbersome and didn't melt evenly. So I did it over an improvised double broiler. In a medium or large pan, bring 4-6 cups of water to a boil. Turn it down to a simmer and place a large metal or glass mixing bowl (that is completely dry so that the chocolate won't seize) that will fit on top of the pan without falling into it, over the top. Place your chopped chocolate into the pan and stir it as it begins to melt. This will take several minutes. Once all the chocolate has melted, you can turn the heat off, but keep the chocolate sitting over the hot water as it will keep it melted while you work. 
I used a teaspoon to place a little dab of melted chocolate into each candy paper cup sitting in the mini muffin pans. After I had put a dollop in each one, I went back with the back of the spoon and spread the chocolate around the bottom of the cup and up the sides. Be sure to get the chocolate up the sides as far as you can. When all of the paper cups in the pan are evenly spread, place the pan in the fridge to set up until firm, about 30 minutes. Keep the remaining chocolate over the simmering water to stay melted until you need it for the top coating. Turn the heat back on under the water, if needed, to return it to a simmer, to keep the chocolate melted.
While the chocolate is in the fridge, you can make your filling. In a mixer, combine the peanut butter, powdered sugar and vanilla. Use the lower quantity of powdered sugar to start and decide if you want to add more to firm it up. 
When the chocolate cups are firmed up, remove them from the fridge, and fill them with the peanut butter filling by the spoonful until they are about 2/3 to 3/4 full. You can spray a little cooking spray on the back of your spoon or even on your clean fingers to pat the peanut butter down evenly into the cups. You want it as flat as possible so that the chocolate coating on top will sit evenly.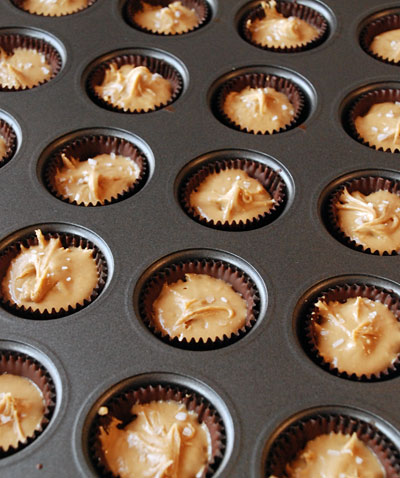
Now sprinkle a few large crunchy crystals of sea salt over the top of the peanut butter filling in each cup. This is really crucial to the flavor, so don't skip this step!
To finish, spoon more melted chocolate over the filling to cover them evenly up to the top. Sprinkle with peanuts. Return to the fridge until set up completely before packaging. Store in the refrigerator. You can remove them from the fridge a few minutes before eating, if you prefer them a little softer.
Yield: approximately 72 cups
Adapted from David Lebovitz.
Apr 8, 2010
Seattle Sampler

And now, a taste of our trip...
We arrived late into Seattle on a Saturday night and made our to the groovy old Scully and Mulder-esque Moore Hotel. The hotel has been serving Seattle since 1907 and sits adjacent to the Moore Theatre, where sadly, we missed seeing Spoon's performance by just a few days.
The Moore Hotel
The hotel is basic, but fun and friendly, and just what we needed for single night's stopover in Seattle on our way to Vancouver. After taking the light rail from the airport, we dropped our bags, and followed the night clerk's suggestion of nearby sushi at Umi Sake House. 
We were blown away by the quality of the fish, the creative flavor combinations and especially, the very reasonable prices. Umi serves izakaya-style, like the informal Japanese bars that serve more substantial food with their drinks rather than just bar snacks. Umi also presents an extensive list of both hot and chilled sakes by the glass or bottle. 
Umi's Moonraker roll
It was after 10pm when we arrived, but the place was rocking. We tried the Moonraker roll (spicy yellowtail, cucumber, cilantro, topped with seared spicy snow crab and black tobiko with jalapeño-citrus sauce and truffle oil), the king crab tower (king crab, snow crab, avocado, and tomato salsa with jalapeño, yuzu aioli and cilantro), wild white king salmon nigiri, wild Copper River Sockeye nigiri, and sake kama. What a feast! (Please forgive the image quality above. I only had my iPhone with me.)
Breakfast at Macrina Bakery
The next morning we had breakfast at the much raved about Macrina Bakery. And I must say, it not only lived up to the hype, but exceeded it. Macrina is well known for their freshly baked breads, muffins, pastries and luckily for us, their weekend brunch. We lucked into the last open table before a long line formed. I had a decadent fried egg topped with balsamic-pickled fiddleheads and a rich, creamy, melty cheese, roasted potatoes, some fresh greens and some of their fresh baked bread and jam. I managed to squeeze in three visits to Macrina during our trip and could have eaten every meal there.
Fueled up and ready to roll, we packed up, and headed for Fremont for a morning of strolling the market and a tour of Theo's chocolate factory before driving to Vancouver.
My husband, the chocolate fiend, was very keen on making the Theo chocolate factory tour, so we anchored our morning around it. We had just enough time to quickly explore the adjacent Fremont Sunday Market. With vendors selling everything from produce to collectibles to prepared foods to artisans offerings, we could have spent hours there.
Instead, we made our way back down the street to Theo for their tour. 
Seattle's Theo Chocolate is the only organic, fair trade, bean-to-bar chocolate producer in the United States. They...
• use only sustainable ingredients and source locally when possible
• make sure that their growers earn a living wage and that their families have access to educational resources
• control every step of their manufacturing process
• use green energy sources to run their factory
• use only sustainable packaging and printing methods
Theo's chocolate roaster
I like supporting a company that does business like this. But how does it taste? 
I'd enjoyed several of Theo's bars and especially, their Big Daddy peanut butter candies — peanut butter praline and vanilla caramel over a graham cracker and covered in chocolate and peanuts. But I'd never had the opportunity to try sample so many of their chocolates. On the tour, you not only get a mini-chocolate education, and a tour of factory and candy-making room, but you also get a chance to try almost every product they make. Seriously, it was an overwhelming amount of chocolate. And then, of course, we bought some more goodies to bring home with us. From caramels to "sipping chocolate" to a huge assortment of chocolate bars, they've got you covered. 
Roasted cacao beans at Theo
Theo is open and offers tours daily. (Be sure to make a reservation, it fills up quickly on the weekends.) I highly recommend the tour and at their store for the ultimate Seattle souvenir. If you can't make it to Seattle right away, in Austin, you can find some of their products at Whole Foods. Find out who has Theo in your local area here.
The Moore Hotel
1926 2nd Avenue, Seattle
206.448.4851
Umi Sake House
2230 1st Avenue, Seattle
206.374.8717
Macrina Cafe & Bakery
multiple locations
Fremont Sunday Market
Phinney Ave. N. and N. 34th St., Freemont
Theo Chocolate
3400 Phinney Ave. N., Freemont
make a tour reservation by calling 206.632.5100
Dec 6, 2009
Chocolate Almond Toffee

A few years ago, I took a baking class from David Lebovitz when he visited Austin. As expected, everything he made was to die for.
Lebovitz, once the pastry chef at Chez Panisse, now lives and blogs in Paris. He is also hilarious. If you ever get an opportunity to take a class from him, don't miss it. He has written all kinds of books to satisfy your sweet tooth. You know how with some cookbooks, you pick out a recipe here and there to try? But with David's books, you can count on every single recipe being a knock-your-socks off hit. If you only have one book on chocolate or one book on ice cream, they should be his.
I've wanted to make this recipe ever since I took the class. I can't believe it took me this long to try it myself. I love toffee and the combination of buttery toffee with just the right amount of salt to set it off, paired with toasted almonds and chocolate is so simple yet each element enhances the others. The sweet, buttery toffee, the crunch of the salted, roasted almond nuttiness and then the chocolate to bring it all home. Oh yeah.
And even better, this is incredibly easy to make. Just don't get intimated by the need for a candy thermometer. It's only a few ingredients and you can whip up a batch in minutes. Huge return on investment. And this time of year, who am I kidding... ANY time of year, it makes a great gift. Just be sure to package it up quick before you eat it all yourself.
I still had some vanilla sea salt from Boulette's Larder in my baking cabinet, so I sprinkled some on top. You could also use fleur de sel.
This recipe appears in David's ice cream book, The Perfect Scoop, in half this quantity. But if you're going to make it, especially this time of year when you can share it as a gift and be the most popular Santa around, why not make the bigger batch?
Chocolate Almond Toffee
2 cups toasted, salted almonds, chopped
2 tablespoons water
1/2 cup (1 stick) salted or unsalted butter, cut into pieces
a nice, big pinch of salt
1 cup granulated sugar
1/4 cup packed light brown sugar
1/4 teaspoon baking soda
1 teaspoon vanilla extract
1 cup bittersweet chocolate, chopped, or chocolate chips
vanilla sea salt or fleur de sel
cooking spray or silpat
candy thermometer
Line a baking sheet with your silpat nonstick mat, parchment paper or spray it with vegetable oil.
Put 1 cup of the almonds on your prepared baking sheet in a single layer forming a rectangle about 8x10 inches. Set aside.
Measure out the baking soda and vanilla and have them sitting next to the stove.
Put the water, butter, salt and sugars into a heavy-bottomed saucepan and stir together. Heat over medium flame until the candy thermometer reaches 300 degrees. Stir as little as possible during heating. When you reach the magic 300 degree mark, remove pan from the heat and stir in the vanilla and baking soda immediately.
Move quickly here... then pour the hot toffee evenly over the almonds on your baking sheet.
Then sprinkle your chocolate evenly over the top of the hot toffee in the pan. Let sit for several minutes to melt.
While you're waiting for the chocolate to melt, you're going to spy the toffee pan with it's bits of toffee turning into concrete and thinking what fun that's going to be to clean up. But take this tip from David: fill the pan with water and put it back on the heat and bring it to a boil. Turn off the heat and let sit until the candy bits melt and then clean up is a breeze.
When the chocolate has melted, spread it evenly over the toffee with an offset icing spatula. Then sprinkle the top with fleur de sel and the remaining almonds — pressing lightly so they'll stay put in the chocolate.
Let cool completely until the toffee becomes solid and the chocolate sets up. Then you can chop it or break it into shards.
Wrap it up in cellophane bags with some pretty ribbon to give as gifts or serve it yourself crumbled over ice cream. To die for!!!
Adapted from David Lebovitz.
Check out David Lebovitz blog here.
Check out his schedule here to find out when you can take a class from him.
Check out his books here.
Sep 13, 2009
Almond Butter Crispy Treats

What is it about "back-to-school" that brings to mind peanut butter and jelly sandwiches, carrot sticks and Rice Krispy treats? When I was visiting Bi-Rite Market in San Francisco, I spied some peanut butter crispy treats dipped in chocolate at the checkout. Talk about an impulse buy. But I think I deserve some credit for making it all the way home with that treat to share with my husband. Ever since, I've been craving them like mad.
After a little experimentation, here's my version. You could really make these any way you want. I tried regular marshmallows, minis, vegan marshmallows (no gelatin), even marshmallow fluff, regular Rice Krispy cereal, organic brown crisped rice cereal... you get the picture. I liked the mini marshmallows with crisped brown rice cereal best. The minis melt faster and the brown rice cereal seemed a little more substantial. You can also make these without marshmallows subbing a caramelly base instead. But for me, it was all about that elastic quality that the marshmallows give.
You could do this with any nut butter. I really like it with the almond butter, but cashew or peanut butter would give it a stronger flavor. I also tried these with more nut butter proportionally, but they came out a little too pasty.
The chocolate dip gives them a little contrast. You get one end with chocolate and one without so you can experience the spectrum of flavors. Toasted almonds add a little crunch. You could spinkle them into the mix with the bar, if you like, but I think they might get pretty smashed up by the mixing.
While I won't pretend that these are in any way healthy, they do make a fun indulgence every once in awhile. They'd be great for a Halloween party too.
Almond Butter Crispy Treats
cooking spray
4 tablespoons butter
16 ounces mini marshmallows
1/2 cup almond butter
1/4 teaspoon salt
1 teaspoon vanilla
10 ounces crisped rice cereal
1 cup 60-70% bittersweet chocolate
1/2 cup slivered almonds, toasted
Prep a 13x9x2 casserole/baking pan with cooking spray. Set aside.
Spray a large saucepan with cooking spray. Melt butter over medium heat. When the butter is melted, add the marshmallows and stir while those melt. You can let them sit a few seconds between stirring, but don't leave them for long. The bottom will brown and the tops will sit undisturbed.
When marshmallows are completely melted, add the almond butter and stir well until melted and completely incorporated. Remove from heat.
Add the salt and vanilla and stir well to combine. Add the crisped rice cereal and stir like mad to get the cereal evenly coated while it's still hot.
Immediately pour into prepared pan. Press into the pan with a spatula. Set aside to cool.
These are really better when you've let them cool completely and have at least an hour or so to set up. They're easier to slice that way too. But I won't blame you for carving out a little corner bit to taste.
While they're cooling, break up your chocolate into a microwave safe bowl and zap in 30-second increments at 50% power until melted. When your treats are completely cooled and set up, slice or cut them with cookie cutters (use cooking spray!!). Dip them into the melted chocolate and set on a parchment- or silpat-lined cookie sheet. Sprinkle with toasted slivered almonds. Let cool for the chocolate to firm up.
Jul 3, 2009
Chewey, Gooey Chocolate Chip Cookies

On the eve of our most American of holidays, I thought I'd share a most American cookie recipe with you. Even people who don't ever cook have made chocolate chip cookies. We all started out as kids making the recipe on the back of the Nestle's chocolate chip bag, right?
This recipe I've been making for years and years. I've made hundreds of batches of these cookies and had plenty of time to experiment with them. I started with Alton Brown's chewy cookie recipe. He did a show demonstrating the techniques for making thin, chewy and puffy chocolate chip cookies. Like there are hot dog people and hamburger people, I suppose there are different kinds of cookie people. It's all about the chewy for me and I'll tell you why: the chewy cookie is, of course, amazing right out the oven. What cookie isn't? But this cookie holds it's integrity the next day and the next, if it lasts that long. Because the dough is allowed to chill, or better yet, freeze, before baking, instead of spreading out all over the place and turning into a thin disc that dries out, it keeps its shape while baking and slowly sort of falls in on itself instead of spreading. This makes for a puddle of cookie in the middle. The photo below shows a cookie on the left that was only chilled (not frozen) before baking. It still spreads out too much. The cookie on the right was frozen before baking and it holds it's shape better to form a puddle of goodness in the center. 
The cookie I want will have creases and overlapping folds, kind of like a floppy puppy with too much fur. While baking, you want them to look like the photo below. See how they are still holding their shape in the center instead of just spreading out?
Before we married, my husband lived 1,000 miles away and I would travel to visit him usually once a month or so. Most of his friends lived in his neighborhood, within a few blocks of each other, and were always hanging out together. These cookies became so popular with them that they would come through the door and ask "Did you make the cookies?" THE cookies. Because these are the kind of cookies you could commit to for life, forsaking all others. My hubby likes them too. (There's a reason his dad nicknamed him "Batch" as a kid.) Couldn't have hurt in helping persuade him to move here.
I have to warn you, these cookies are more trouble than the average chocolate chip cookie. But once you've had them, there's no going back. And all the credit goes to Mr. Brown, the Bill Nye of the food world. His technique really works. I just took it one step further by freezing the dough balls, to ensure the perfect cookie every time. Otherwise, if you just chill the dough before baking, it sometimes spreads a bit too much. If the dough is scooped out with a small ice cream scoop (a #40 size) and frozen completely, then baked, it will hold it's shape initially and then fall down in a puddle just like it should, without excessive spreading. That's the secret. 
The recipe also calls for a few departures from the traditional -- all in the name of chewy... the use of bread flour instead of all-purpose; melting the butter instead of just softening it; a little milk; more brown sugar than white sugar; an extra egg yolk; and a baking temperature of 375 degrees instead of 350.
Note: I'm giving you the single batch amounts here, but I rarely make these without making a double batch. Since you're going to freeze the dough balls anyway, they are very easy to bake off as needed for hot cookies anytime. The only problem here is that this is also the finest cookie dough you will ever taste. And when you open the freezer and see those little dough balls peeking out at you through their freezer bag, you'll be seduced into eating them straight from the freezer, as I must confess, I just did while typing this. (As I was taking the bag from the freezer, I noted that earlier in the day there were two freezer bags of cookie dough balls, and now there is just one. Hmm. My hubby was alone in the house this afternoon. Suspicious.)
Be sure to buy some quality dark chocolate chips, not semisweet, which is too sweet in an already sweet cookie. These are my favorites and they're easily accessible in the grocery store these days: Ghiradelli's 60% chip and Scharffen Berger's 70% bittersweet chunk.
Last tip: get a #40 ice cream scoop at a restaurant supply store. I went through several before finding one (cheaper) in a restaurant supply that has endured long past the others, even an Oxo one. You want the kind with a little arm that sweeps the inside of the scoop to release the dough.
While they are humble in appearance, these make wonderful gifts and elicit moans of pleasure.
Chewy, Gooey Chocolate Chip Cookies
2 1/4 cups bread flour
1 teaspoon salt
1 teaspoon baking soda
2 sticks unsalted butter
1/4 cup sugar
1 1/4 cups brown sugar
1 egg + 1 egg yolk
2 tablespoons milk (I use whole milk)
2 teaspoons vanilla
1 1/2 cups chocolate chips or chunks
vegetable oil spray
Sift together the flour, salt and baking soda. Set aside.
In a small bowl, combine the egg, egg yolk, milk and vanilla. Set aside.
Melt the butter (I usually do it in the microwave in 20-30 second rounds at 50% power until melted.) Add the sugars and mix together until well combined.
Add the egg mixture and mix again until well combined.
About a third at a time, add the flour and mix in.
Stir in the chocolate chips.
Using a spatula, scrape around the edges and bottom of the bowl to make sure everything is well incorporated.
At this point, you can cover the dough and chill it for later scooping, or jump right into the scooping...
Take your #40 ice cream scoop and hold it over the sink while spraying it inside and out with vegetable oil spray. You can shake off the excess. If it gets sticky part way through, just rinse it off and spray and start again.
Scoop the dough out and place on a silpat or parchment-lined cookie sheet or half sheet pan. Be sure it will fit inside your freezer. You can line up your dough wads pretty close together to make the most of the space. You won't be baking them on this, just freezing. When the dough is all scooped out, place the pan in the freezer until frozen through (I've never timed this, but it happens pretty quickly, less than an hour.)
When the dough balls are frozen through, place them in an airtight freezer bag to store until baking. Store in freezer.
To bake, preheat oven to 375 degrees.
Place 6-8 balls of dough on a half sheet-sized pan. You don't want them bumping into each other. Bake for approximately 12 minutes. You might set your timer for 10-11 minutes and start watching them continuously from there. This is very important!! You want to pull them out when they still look slightly underdone in the center, but golden brown around the edges. You'll have to learn how they bake in your oven to decide on the perfect baking time. Also, watch to see if you need to rotate them halfway through for even baking.
Remove from oven and let cool in pan on a rack until completely cool. If you're baking more, use another sheet or wait on this one. Do not rush them out of their pan. They need to cool completely to set up and come off the pan without falling apart. They will continue cooking in the pan while cooling. Your patience will be rewarded!
Makes approximately 2 dozen cookies. Recipes easily doubles.
Adapted from Alton Brown.
May 25, 2009
Food Find: Kallari Chocolate Bars

I listen to KCRW's Good Food podcast every week. Evan Kleinman's show is always informative, intriguing, entertaining, and educational. I am tortured by the Santa Monica Farmers' Market reports. I wish we had that range of produce locally. Recently, they did a story on Kallari Chocolate. I had seen this new brand, but hadn't tried it. I brought some home recently and we discovered our favorite new chocolate.
Most cacao growers produce their beans for shipment all over the world for processing into the chocolate bars and confections we eat. As every chocolate-lover knows, good quality chocolate is an expensive indulgence/addiction. But the growers don't usually see much of that money. There are middlemen and processors. Everyone takes a bite.
Kallari is a cooperative of growers who grow, process and produce their own organic chocolate bars in Ecuador. It is sold in the U.S. exclusively at Whole Foods. Judy Logback, an American volunteering with a foundation promoting biodiversity in Ecuador, met with the farmers in 1997. They said they wanted to find a way to succeed on their farms while facing the pressure to log, drill or mine their lands to survive. Logback helped them find their way down a long road to becoming possibly the only cacao farmers making and marketing their own chocolate. Read their whole story in this piece in the New York Times or listen to Good Food's interview with Judy Logback.
The bars at being distributed in the U.S. exclusively through Whole Foods. They come in 70%, 75% and 85% cacao for $4.99 each.
We've tasted the 70% and the 75% and really like them both. Try them and see what you think.
Feb 10, 2009
Brownies

Looking for something to make your sweetie for Valentine's Day or maybe just looking to be sweet to yourself? These brownies are the thing. I used to have a favorite cappucino brownie recipe. They were quite tasty and gorgeous when cut on a diagonal and spinkled half and half with powdered sugar and cocoa powder. But then I found these brownies and forgot all about those other ones. Haven't made them since, in fact.
These brownies have a lot going for them. They're incredibly easy to make...for kids, nonbakers, even folks with almost no kitchen tools. You only need a big spoon or a whisk, one large bowl, one small bowl and a baking pan. Now understand that these brownies would be worth it even if you had to dirty up every bowl in the kitchen and had flour in your hair. But you don't. They can be stirred together in minutes.
The only fussiness comes from putting foil or parchment across the baking pan to make a sling. You're certainly welcome to make them without this step, but it makes them so much easier to remove in one piece. Then you can cut them however you like, if you get a chance to cut them at all. 
One more thing, and I know this will probably go unheard in most cases. But just know, these brownies are really, really good when you make them and just let them cool a little. But if you wait until the next day...they are ohhhhmygawwwwwd good. So try making them the night before. Let them cool completely after baking, cover them and refrigerate or let sit out on the counter overnight. The next day they will be to die for. I have yet to find anyone (not one single person) who hasn't been blown away by these brownies. People who don't like sweets, even people who don't like chocolate. Heck, I'm not even that much of a brownie fan myself. But these elevate the genre.
Be sure to use good quality chocolate. By that I mean not the cheapo chocolate chips. Get 60-70% bittersweet chocolate, like Ghiradelli or Scharrfen Berger. You will be rewarded. You can also add nuts to these, if you like, about 1/2 - 2/3 cup. I've made them with chopped, salted macadamias and they were lovely. But I prefer them straight up. Nuts or no nuts in your brownies is kind of a religious thing, like beans or no beans in your chili. It's your call.
I ran across this recipe on my favorite baking blog by David Lebovitz. He shared the recipe from the book Chocolate: From Simple Cookies to Extravagant Showstoppers by Nick Malgieri. I hestitated about sharing this one because it's fully presented on David's funny and informative blog. But these brownies are so good, everyone needs to know about them. I can only imagine the other recipes that might be found in Malgieri's book. So I hope this turns you on to not only the brownies, but a great baking blog and an award-winning baking book. Thank you Mr. Lebovitz and Mr. Malgieri for sharing the love with these brownies.
By the way, David lives in Paris, but often teaches in the U.S. He's got a new book coming out this spring called The Sweet Life in Paris. Check it out. He also teaches classes and does a chocolate tour of Paris. Check out his schedule for more infomation. I've taken one of his classes and can tell you to run, not walk, to sign up. His desserts are reliably spectacular and he is wet-your-pants hilarious. His ice cream book, The Perfect Scoop, is my bible on making ice cream.
Brownies
8 ounces 60-70% bittersweet chocolate, chopped
2 sticks unsalted butter (1 cup or 228 grams)
4 eggs
1/2 teaspoon salt
1 cup sugar
1 cup brown sugar
2 teaspoons vanilla
1 cup flour
Preheat your oven to 350 degrees.
With softened butter or cooking spray, grease a square baking pan (mine is 9 1/2 x 9 1/2 inches when measured across the top). Now cut a strip of parchment paper or foil a little narrower than the width of the pan and long enough to hang over on both sides. Place the foil/parchment in the pan and press it against the sides. It will stick to the pan. Now grease the paper as well. This seems fussy, but will insure that you get these babies out of the pan in one piece. The overhanging sides will act as a sling to lift out the brownies -- only when they are completely cool! You hear me!
In a cereal or soup-sized bowl, put the chopped chocolate and the butter. Microwave on 50% power in 30-second increments until the butter is completely melted. The chocolate won't look melted, but stir them together and it will melt completely. Set aside.
In a large mixing bowl, whisk or stir together the eggs, salt, sugars and vanilla. (I like to use a giant version of my favorite whisk to do this. See photo. I have several mini-versions of this whisk for eggs, etc. But this big daddy version is reserved for heavy batters and mostly, these brownies. It is the perfect tool to mix these together.)
Add the melted chocolate to the egg mixture and whisk/stir together. Add the flour and gently whisk together completely.
Pour the batter into the prepared pan and bake for about 45 minutes, until the top is crackly and shiny. (You want fudginess, so the toothpick test doesn't really work here.)
Let cool completely. COMPLETELY. Then, if you can't stand it, using the sling you made with foil/parchment, lift the brownies out in one piece, slice and eat. But if you are made of stronger stuff than most, cover the cooled brownies in the pan and refrigerate or let sit on a cool counter overnight. The next day, use the sling to remove them, peel off the parchment/foil, slice and enjoy.
I like to say that these will serve 9, if cut into 9 squares, or my husband. (He's in the kitchen circling around the cooling brownies as I type this.)
Adapted from David Lebovitz and Nick Malgieri. Bless you both.
Happy Valentine's!
Jan 4, 2009
Chocolate Almond Bars

So my holiday baking may have started slow, a bit late for posting here in time for preholiday planning. Sorry for that. I had a work deadline, and then suddenly it was Christmas. But I know that's how it is for everyone. Now that we're safely past New Year's, I'm making up for lost time. I can't stop baking.
There have been several experiments. Some chocolate hazelnut cookies with warm spices, that were just, well, too spicy, for my enjoyment. But that little detour has been more than made up for by these fine specimens. These chocolate almond bars have a lot going for them. They are fast and easy to put together in the food processor. They are primarily made of almond butter and as we all know, almonds are way good for us. They are gluten-free, no flour. And they combine two of my favorite flavor combos–almonds and chocolate. 
This comes from a little recipe tucked away in the December issue of Food & Wine. It didn't take up much space and there wasn't even a photo with it to seduce me but the ingredient list intrigued me.
These will bake up pretty soft. You'll think they aren't done, but pull them out anyway. You'll like their chewy centers.
Also, the original recipe called for salted almond butter. We couldn't find any with salt, so I added a wee bit to bring up the flavor. It was just right. They'll taste flat without it. 
Also, in collecting ingredients during preholiday shopping, I ran across some new chocolate chips and chunks. Scharffen Berger has these new 70% baking chunks. (We should all just take a moment here and say, thank you.) Ghiradelli has new "gourmet baking chips" in different percentages. I tried the 72% in several things this Christmas and used them here too. You can also find Dagoba Xocoatl cocoa nibs which would make an excellent addition to any chocolate cookie that you wanted to give a little kick. Scharffen Berger also has tasty nibs. And last, at Costco I happened to find a 3 pound (!) bag of my default chocolate chips, Ghiradelli's 60% chips.
Be forewarned, it's really, really hard to stop eating these. I had to pry them away from my husband so that I could get a photo. Usually I can try one cookie and walk away. But these things are subtle. By the third or fourth bite, you're reaching for another one and then you're hooked. My husband says it's "the chewiness with the roasty nuttiness and then, of course, there's the chocolate." Uh huh. What he said.
Chocolate Almond Bars
1 cup roasted almond butter
2 cups powdered sugar
4 tablespoons unsalted butter, at room temperature
1 teaspoon salt
1/2 teaspoon baking soda
1 egg
3/4 cup dark (70%) chocolate chips or chunks
1/2 cup salted, roasted almonds, chopped
Preheat oven to 375 degrees.
Line a baking pan (approximately 8x12 or 9x13 inch) with foil or parchment, leaving an overhang to act as a sling later. Spray with cooking spray. Set aside.
If you're using a new jar of almond butter, you might notice the oil will probably be separated on top of the almond butter. Take a moment to stir it up with a spoon or knife to incorporate the oil back into the butter. It doesn't have to be completely homogenous, just stir them together.
In a food processor, combine the almond butter, powdered sugar, butter, baking soda, salt and egg. Pulse until it's combined and creamy looking. (The recipe warns that if you overmix, the fat can separate, but I didn't have any problems.)
Turn out the dough into a bowl and add the roasted almonds and chocolate chips or chunks. Using a sturdy wooden spoon, stir in the nuts and chips.
Dump out the dough into the greased pan and flatten it out evenly with the wooden spoon.
Bake for 18-20 minutes. No more. They won't look done, but pull them out anyway. And be careful when you pull them out of the oven, don't tilt the pan or they could slide a bit.
Let cool on a rack for at least 30 minutes. Use the overhanging parchment/foil to lift the bars out of the pan. Be careful, they crumble easily. Set down on a cutting board and cut into bars, batons, even rounds using a biscuit cutter...whatever you like. Just keep them relatively small as they will crumble easily and are easier to hang on to if they aren't too big. How many you get out of this recipe depends on how you cut them so I'll leave that up to you.
The recipe says they keep up to 3 days in a container, but I can't imagine them lasting that long. See if you can make them last 24 hours.
Adapted from the December 2008 issue of Food & Wine magazine.
Sep 5, 2008
Report from the Field: NM, part 2

I have one more treat to share from our road trip and it is, happily, chocolate. Conveniently located in the same building with Tara's Organic Ice Cream in Santa Fe is the ChocolateSmith. They specialize in dark chocolate, so for us, there was no passing this up. Usually, we zero in on the few dark or bittersweet chocolate offerings in a shop like this. We're both fans of deep dark chocolate. But with a whole shop devoted to dark chocolate, it was a challenge to narrow down our picks to what would fit in one takeaway box (and in our cooler). 
My hubby, the real chocolate fiend, asked for their red chili pistachio bark – pistachios dusted with New Mexico red chili and buried in dark chocolate. A really good choice. He's devoted to Dagoba's Xocolatl bar, which includes chiles, nibs and spices in a 74% cacao bar. So this ChocolateSmith chili pistachio bar was a natural choice for him. The red chili kick was slow in coming, but packed a punch, but not too much. It gave you time to enjoy the chocolate and pistachios first.
We also tried the Spat – a square of caramel topped with tarmari pine nuts and coated on the bottom and sides with dark chocolate. It was an ooey gooey treat. I love caramel and really enjoyed this New Mexican version.

The peppermint crunch disc was deep, dark and refreshing. The mint was milder than I expected but delightful. A little palate cleanser after the other flavors.
The classic almond bark is just as it should be. I can never pass this one by. It's my favorite chocolate combination. I think it's my grandmother's fault. All those years ago when she bought me almond Hershey bars. I got hooked on the taste of toasted almonds with chocolate. Although, I like to think my palate has evolved a little since then, I still enjoy the nostalgic flavors of an almond Hershey bar. That's the one I look for in the Halloween bowl.
Last, we tried the toffee almond bark. I expected the crunch of a layer of toffee in the center, but instead, found a chocolate bar with bits of toffee and salty almonds layered on top. It was a really nice variation. I love toffee too, but sometimes it can be too much of a sugary sweet thing. The greater proportion of dark chocolate kept the toffee from being too sweet. Just meant you wanted to eat more. Not sure if that's a good thing or not. But I liked their version.
If this has got your mouth watering, you can order some yourself online. We'll certainly be heading back there next time we're in Santa Fe.
Wonder if there's any left in our stash...
ChocolateSmith
1807 Second Street, #35
Santa Fe, NM, 87501
888.473.2111
Jul 27, 2008
Chocolate Pandan Ice Cream

Chocolate ice cream is not to be taken lightly. It's serious business. I've tried many recipes, but this one is, by far, THE ONE. The chocolate ice cream recipe is based on David Lebovitz version from The Perfect Scoop. It is the best I have ever tasted. Hands down. David is the man. And I would have stopped there, very satisfied. But I'm a big fan of Katrina Markoff's creations for her company, Vosges Haut-Chocolat.
On her web site, I had seen her ice cream flavors. But I'd never gotten around to actually placing an order. My husband and I sent each other her chocolates many times during our courtship. But then our Whole Foods began carrying much of her line and it seemed just too indulgent (even for me) to order ice cream from across the country. So I pined for the chocolate pandan flavor, having only tasted her chocolate pandan truffle.
Then, one day while virtuously gliding by the Central Market ice cream selection, I spotted her ice cream line. Without thinking, I squealed and bounced. I couldn't help it. People laughed, but I didn't care. Vosges chocolate pandan ice cream was here. In my hands. Well, OK, so we bought the Red Fire and Wattleseed too. They were all as good as her truffles, a high standard. But I loved the chocolate pandan most. I'd never even heard of pandan before Vosges. Thus, the quest to make my own began.
I started digging around and found that pandan is a leaf used in Thai and Southeast Asian cuisines. You can sometimes find the leaves frozen in Asian markets. But I found pandan extract to be much more common. The only catch, it's bright green. That works fine in chocolate ice cream, you can't see it. But try a little in some rice and you get a Dr. Seuss dinner. But it's worth it for the flavor. Markoff describes it as having notes of pine nut, vanilla wafers and tree nuts. A small amount goes a long way. But it adds another dimension to chocolate, particularly chocolate ice cream. 
So I put just a wee bit (1/2 teaspoon) into my favorite chocolate ice cream and it reached a higher plane. It is aromatic, slightly nutty, but not in a definitive or overwhelming way. It just adds a little something, much like a little coffee is often added to chocolate to enhance it's chocolateness. It somehow makes it more chocolate.
David's recipe is superluscious. He calls for 2 cups of cream to 1 cup of whole milk. I adjusted that proportion to have a little more milk. It could probably go down to 2/3 milk and 1/3 cream, but the texture might suffer then and we wouldn't want that. Be as decadent as you like, but definitely try it with the pandan.
One tip: plan ahead. The base should really be made the day before you want to serve it, to allow enough time for chilling.
Chocolate Pandan Ice Cream
1 1/2 cups cream
1 1/2 cups whole milk
5 ounces 70% bittersweet chocolate, chopped finely
3 tablespoons unsweetened Dutch-process cocoa powder
3/4 cup sugar
pinch of salt
5 egg yolks
1 teaspoon vanilla extract
1/2 teaspoon pandan extract
Combine the cream and cocoa in a small saucepan over medium-low heat. Whisk together as it comes to a boil to combine well. When it comes to a boil, reduce the heat and simmer at a very low boil for 30 seconds, whisking continuously. Take it off the heat, add the chocolate and stir until the chocolate melts and becomes incorporated. Pour into a large bowl (with a spout if you have one).
Using the same saucepan you just emptied, combine the milk, sugar and salt. Warm over low heat just until it simmers. While it's heating, in a separate bowl, whisk together your egg yolks. When the milk is warm and the sugar has dissolved in it completely, very slowly pour the milk into the eggs, whisking constantly, to temper them. Then pour the eggs and milk back into the saucepan. (I know, it starts seeming a little fussy here, but stick with it. It's so worth it.)
Heat the egg/milk mixture over medium heat, stirring constantly, just until it starts to thicken and will coat the back of a spoon. You can test it by running your finger down the back of the spoon. If it leaves a trail, you're there.
Remove from heat and pour through a sieve into the chocolate mixture. Stir together well.
Place the chocolate ice cream base bowl into a larger bowl. Fill around the sides of the larger bowl with ice and cold water to make an ice bath. Let it chill in the ice bath until the ice melts. While it's chilling, stir in the vanilla and pandan.
Then pour it into a lidded container and place in the fridge overnight to thoroughly chill. This will make for better ice cream.
The next day, process in your ice cream maker according to its instructions.
Makes about 1 quart.
Adapted from The Perfect Scoop by David Lebovitz.
Note: I also tried serving this in little chocolate shells from the baking aisle in the market. Place a spoonful in each just after it comes out of the ice cream machine, while it's still soft. The shells come in a handy plastic tray which was perfect for placing on our toaster oven tray and placing in the freezer. Take them out in about an hour and place in a sealed container. Eat them within 24 hours for best texture.
May 9, 2008
Chocolate Covered Strawberries with Pistachios

Strawberry season is upon us (at least in Texas). You can find ripe, warm, fresh, organic strawberries all over or even pick your own at u-pick-em farms. I've had a fancy to try making a vanilla ice cream ribboned with a balsamic strawberry reduction, but haven't gotten there yet. Soon.
I was inspired by an old clipping I had from Delicious magazine for these chocolate-covered berries dipped in pistachios. So gorgeous! They're also incredibly fast, easy and delicious.
Note: I tried chopping the pistachios in a food processor but it turned some of them into dust before others were even touched. So I finished them by hand. Also, I did half the berries with pistachios and half with just chocolate for contrast. But the quantities below should be enough for doing all of them with pistachios, if you like.
Chocolate-covered strawberries with pistachios
1 pound organic strawberries
6 ounces bittersweet chocolate, chopped
1 tablespoon unsalted butter
pinch of salt
4 ounces unsalted pistachios, toasted and chopped finely
bamboo skewers
Put chocolate and butter in a microwave-safe bowl. Melt in 30-second increments, two times. Chocolate won't be completely melted, but you can stir it the rest of the way until it's smooth. Add a pinch of salt and stir in.
Press skewers into tops of berries. (I left the little green tops on because they are so much prettier. You can also do this with popsicle sticks or longer skewers, I just liked these little Asian ones.)
Dip berries individually into melted chocolate and let excess drip off.
Then dip into pistachios, covering on all sides.
Set on parchment-covered cookie sheet or tray.
Continue with the rest of the berries.
Place in fridge until ready to serve. Best served within a few hours.
Adapted from Delicious magazine.
Apr 27, 2008
Liberty Bar Chocolate Cake

April is birthday month around here. We're not usually big cake eaters, but this one is worth the exception. A few months ago, I was in San Antonio for a photo shoot. Despite living only a little over an hour away, I haven't spent that much time in the Alamo City. So I scanned the Texas Monthly restaurant reviews for some lunch suggestions. I presented a few of the choices to my partner in crime, Dennis, and lucky for me, he zoned right in on Liberty Bar. We've been there twice now and both times the food was really fresh and exceptionally well-prepared. I could go on and on talking about how good it was, but what I'm here to share with you is the chocolate cake we had for dessert.
As I said, I'm not much of a cake eater. Usually, cakes are pretty, but the taste doesn't usually live up to the promise of all the decoration. Cakes usually disappoint. Not this one. This one knocks you out of your seat. It's dense. DENSE. It's rich. It's a hefty slab of moist chocolate heaven. The kind of flavor you want to roll around in. And the icing is just as intense. They serve multiple flavors of homemade ice cream at Liberty Bar. We tried it with the Mexican Chocolate. That put it way over the top. The spicy cinnamon chocolate ice cream melting in a pool next to the cake made for the best chocolate cake experience I've ever had. D and I buzzed about it all the way home. We wished we'd gotten more to bring home. The next time we went back, we did. I was haunted by that cake.
So I did some looking around online and found the recipe. It makes a two-layer nine inch cake. I sometimes like to make little cakes, 6-inchers. There's something more fun about them. And you can use the leftover batter and icing for cupcakes. So I tried that. The only difference I noticed between this cake and the one we had at Liberty Bar, was that mine wasn't quite as moist. I think that's because I was experimenting with the cooking time since the cakes were 6 inches instead of 9. So next time, I'll pull them out a little sooner. Otherwise, they were dead on.
Now, I just need to find the perfect Mexican Chocolate ice cream recipe. Time to pull out David Lebovitz's ice cream book again and see what he has to offer. Yum.
One note: the icing has to be made at least 3-4 hours or the night before to set properly, so plan ahead. It's worth it.
Chocolate Cake and Chocolate Icing
from Liberty Bar in San Antonio
cake:
6 ounces unsalted butter, room temperature
2 cups sugar
3 eggs, room temperature
1 cup buttermilk, room temperature
1 cup sifted Dutch process cocoa powder
1 cup boiling water
1 teaspoon baking soda
1 teaspoon vanilla
3 cups sifted cake flour
1/4 teaspoon salt
2 9-inch round cake pans (or smaller with leftovers baked in cupcake liners)
Grease and flour cake pans.
Preheat oven to 350 degrees.
Combine sifted flour and salt together in a bowl and set aside.
Place sifted cocoa in a bowl and add boiling water, stirring until completely dissolved. Add baking soda, but do not stir. Just set aside.
Combine eggs and sugar in food processor and whiz for one minute.
Scrape down sides, process for another 30 seconds.
Add butter and process for another minute.
Scrape down sides again and process for another 30 seconds.
Add buttermilk to processor and pulse 3-4 times.
Scrape down sides, pulse again.
Add cocoa mixture and pulse 3 times.
Scrape down sides and pulse one more time.
Pour batter into greased and floured pans. Drop each pan on the counter a few times to release any potential air bubbles.
For 9-inch cakes, bake 30-35 minutes. For 6-inch cakes, bake 20-25 minutes. I waited longer, using the toothpick test and ended up cooking them too long. Next time I'll err on the side of them being slightly underdone rather than overdone so as to preserve the moisture. Cupcakes will take about 15-20 minutes.
Let cool in pan on wire rack. Remove from pan and cool completely before icing.
Chocolate Icing:
2 cups sugar
3 sticks unsalted butter, cut into cubes
11 ounces unsweetened chocolate, cut into shavings or small pieces
18 ounces evaporated milk
1 1/2 teaspoons vanilla
Mix sugar and milk in a heavy, large saucepan. Bring to a boil over medium heat.
Reduce heat slightly and boil vigorously, undisturbed, for at least 9 minutes. Do not stir or will not thicken properly.
Remove pan from heat, add chocolate, vanilla and butter. Stir together until all ingredients are melted together and combined.
Refrigerate icing for at least 3 hours or overnight.
Remove from fridge and let warm up on counter for at least 30 minutes before applying.
Apply one thin layer of "crumb coat" icing and then return cake to refrigerator. Let icing harden for 30 minutes or so. Then apply the rest of the icing. I decorated the sides of the cake with chocolate shavings.
Enjoy.
Feb 4, 2008
Tofu Chocolate Pudding

Tofu chocolate pudding?!? Don't make a hairball sound. This stuff is good. Really good. And you can pig out on it without any guilt. If you want an excuse to eat chocolate pudding for breakfast, this is it. Or in my case, if you've had oral surgery and have to eat liquids for days on end and are going out of your mind, this will fill you up (a hard-to-beat quality when you're on a liquid diet) and it tastes good. Tastes like it's supposed to, not a baby food version of something else.
I originally saw a recipe in a fitness magazine using tofu as a base for chocolate pudding. That pudding was just OK, but had some potential. With some additions for flavor and texture, this one is addictive. The key is taking the time to let the flavor develop. If you taste it right after mixing it up, you'll be disappointed. So don't. Just wait. Stick it in the fridge overnight and try it the next day. Better yet, wait two days. The longer it sits there, the more the tofu takes on the chocolate and other flavorings. Sadly, that last little spoonful you get at the bottom of the container always tastes the best. But that will just make you want to make more. I dare you not to get hooked.
I turned up the flavor by using Mexican vanilla, a shot of instant coffee, cinnamon and chocolate extract. All of these together build layers of flavor. You could probably use coffee extract instead of the instant coffee, if you like.
2 cups silken tofu
4 ounces bittersweet (70%) chocolate, chopped
1 tablespoon instant coffee (I use decaf)
1/2 cup nonfat or lowfat sour cream
1/2 cup nonfat vanilla yogurt (I use Stonyfield)
1 tablespoon Mexican vanilla
1 teaspoon cinnamon
1 teaspoon chocolate extract
1/4 cup chocolate soy milk
Melt the chopped chocolate in a bowl in the microwave in 30 second increments at 50% power. Repeat until the chocolate starts melting. Stir to smooth out.
Dissolve the instant coffee into 1/4 cup boiling water. Stir to dissolve completely.
Combine the dissolved coffee and all the other ingredients in a blender and whiz. Scrape down the sides and whiz again.
Add the melted chocolate and whiz again until well blended.
Put in the fridge in a covered container and forget about it for 24 hours. At least. Do not taste it before then. It will taste like naked tofu and nobody wants that. After 24 hours, you can see if you want to adjust the flavors. Experiment with it. Make it your own.
I'd love to give you a serving count, but frankly, we usually just eat a few spoonfuls of this stuff straight from the container. It's surprisingly filling. As much as you might want to scarf down a whole bowl of it, you probably won't be able to. It'll fill you up right quick.
