

Here's my favorite new cookie recipe to wish you belated happy holidays. I can't seem to stop making these. They are the perfect winter cookie spiced with warming ginger and cinnamon. They are tender, soft and cakey on the inside with the slightest snap of a crust on the outside.
The original (gluten) recipe comes from Chez Panisse. But I spotted Shauna's gluten-free version on her site, Gluten-Free Girl and the Chef and was inspired, as I am by so many of her posts and recipes, to try them. I love that they don't contain any xanthan or guar gums, commonly found in most gluten-free recipes, each of which have adverse effects on me.
I started with Shauna's version and then began experimenting. First, I traded the butter for coconut oil, and used mostly maple syrup with a little brown sugar instead of the white sugar. And I also tried it with brown rice flour and chia instead of the white rice flour.
These cookies are addictive and the perfect accompaniment for a cup of hot tea, eggnog or horchata. They also make a great whoopie pie, sandwich cookie or ice cream sandwich. I made a whoopie pie for the photo with an eggnog filling (1 1/2 cups powdered sugar and 2 tablespoons eggnog. If you're going dairy-free, try a nondairy eggnog or rice milk-based horchata). But I most like to eat them on their own. Straight, simple, comforting. And I must mention, if you have an unhappy tummy, the ginger in these will make you feel much better. Rx: cookie!
I've been making double batches of these and keeping the dough in the freezer. I bake up a cookie sheet full at a time for fresh hot cookies on demand. (I have to confess to eating the occasional dough ball straight from the freezer and in the heat of summer, I find them particularly refreshing that way.)
Plan ahead, these need to go into the freezer for several hours or overnight. But you can make them like I do and keep the dough in the freezer for cookies anytime. I use a #40 ice cream scoop from the restaurant supply shop to make even, perfectly round cookies. These scoops are inexpensive and seem to be more sturdy than most others that I've used.
Happy baking to all and to all a good night! And a big thank you to Shauna for turning me on to these incredible cookies!
Ginger Cookies
1 1/2 cups sorghum flour
1 1/2 cups brown rice flour
2 tablespoons ground chia seeds
2 1/2 teaspoons baking soda
1/2 teaspoon salt
2 1/2 teaspoons cinnamon
3 teaspoons ground ginger
1 cup coconut oil, room temperature
3/4 cup maple syrup
1/4 cup brown sugar
2 eggs
1 teaspoon vanilla
1/4 cup molasses
Measure out the flours and combine them in a medium-sized bowl. Add the chia, soda, salt, ginger and cinnamon. Whisk together to combine well. Set aside.
In a large mixing bowl, combine the coconut oil, maple syrup and brown sugar. With a mixer, (I used a hand mixer), cream together. Add the eggs, vanilla and molasses, and mix again until evenly incorporated.
Add the flour mixture, half at a time and mix until completely incorporated.
Transfer the dough to a covered container and put into the freezer overnight or for several hours.
Before baking, preheat oven to 350 degrees F. Remove the dough from the freezer and using a #40 ice cream scoop, make as many dough balls as you want to bake. Place the dough balls on a silpat- or parchment-lined baking sheet and return the sheet to the freezer, while the oven warms up. When the oven is ready, move the cookie sheet from the freezer straight into the oven. Bake for 12 minutes. The cookies will look just slightly underdone when you remove them from the oven, but they will continue cooking on the sheet until they cool. Let cool completely on the sheet to firm up (or they'll stick and fall apart).
I think these have the best texture when eaten the same day or the next day after baking.
Note: once the dough has frozen, you can also scoop out your dough balls and freeze them in a covered container or ziptop bag for faster baking later on. Just remember to bake them straight from the freezer to hold their round shape.
Enjoy!
Adapted from Chez Panisse and Gluten-Free Girl and the Chef.
Dec 27, 2011
Gluten-Free and Dairy-Free Ginger Cookies

Aug 19, 2011
Postcards from Sisters, Oregon
After lunch at Pok Pok Noi in Portland, we drove south and west to Sisters, Oregon. We spent one night on our way to Bend, in the little town just north of Bend.

Our little cabin at Five Pine.
We're big believers in the restorative value of spending some quiet cabin time, preferably in off-the-grid locations. The more remote the better. So heavily populated resorts are not usually our thing. But I have to say that we were impressed by Five Pine Resort's little cabins and the privacy they afforded nestled among the trees side by side. Five Pine is a relatively new resort and they have given a lot of thought to detail. Our cabin was beautiful, luxurious, sparkling clean, and the perfect antidote to a day of thousands of miles of travel. The cabins are beautifully decorated in Craftsman-style furniture. There's a fireplace (did I mention that temps were in the 40s at night??), a patio with a view of the woods, one of most comfortable beds we've ever slept in, and a spa bathroom that included a deep, deep soaking tub. Best bath ever!! The property is covered in wildflowers and the sounds of a little stream that runs through the buildings.

The inside of our Five Pine cabin.
Five Pine offers a free breakfast buffet which included yogurt, granola, muffins, and gluten-free safe items like fruit and boiled eggs. This made for the perfect light breakfast before we headed to Five Pine's Shibui Spa for massages — a surprise treat from my husband. Five Pine also has an athletic club with indoor pool and hot tub that guests can access for free, it's own movie theater, and a couple of restaurants. We tried the casual Three Creeks Brewing Company for dinner. The gluten-free items on their menu were clearly marked, making ordering easy for me. The food was very fresh and perfectly prepared. We tried the spinach salad, and a steak with veggies and mashed potatoes. The restaurant was packed with families waiting in line, but the two of us were seated right away. Five Pine also has a higher-end restaurant, Thyme, which we didn't get a chance to try.

The counter at Angeline's Bakery in Sisters.

A gluten-free treat from Angeline's Bakery: marionberry coffeecake.
After our massages, we took a few minutes to walk through Sisters and have lunch at Angeline's Bakery. They have vegan, vegetarian and gluten-free items, including the marionberry coffee cake that I tried. I don't get to indulge in baked goods very much anymore, unless I make them myself, so this was a real treat. I love marionberries — a kind of blackberry that is larger, juicier and sweeter than ordinary blackberries. The cake was rich and dense but not too sweet, a good vehicle for the marionberries.

Next up, more photos and adventures from Bend.
Five Pine Lodge and Resort
Angeline's Bakery
Three Creeks Brewing Company
Shibui Spa
Jul 5, 2011
Frozen Lime Pies with Gluten-Free Graham Cracker Crust

Pie seems like the perfect dessert for celebrating July 4th. Shauna James Ahern, of Gluten-Free Girl and the Chef, threw out an invitation to bakers and bloggers for a pie party today — to celebrate the fruits of summer by baking a pie and posting about it today. Over 1,000 people signed up! Take a look around the blogosphere today and get inspired to make your own pie. Also, check out #pieparty on Twitter.
Key lime pie has always been one of my favorites. When I saw that local jam-making extraordinaire Confituras had some lime curd at their farmers market table this weekend, I started thinking tart and tangy lime was the way to go.
I've always loved key lime pie with a sandy graham cracker crust. But the gluten-free graham crackers I've seen in the store are full of gums that make my head or tummy unhappy. So I first set about baking gluten-free graham crackers with Shauna's recipe. Note, Shauna is now baking without gums as well, but this is an older recipe where she used xanthan and guar gum. I substituted chia seeds instead and they worked very well. Chia seeds are good for you. They are high in Omega-3 fatty acids and unlike flax seeds, they don't have to be ground for your body to access their nutrients. They also keep longer than flax without becoming rancid. Chia seeds form a thickening gel when wet that is a good substitute for gluten as a binder to keep your baked goods from falling apart. Learn more about chia seeds here.
I've always loved the comforting, homey flavor of graham crackers. But I have to say, these are better than any graham cracker I've had before. They are a little lighter in color than the store-bought crackers I grew up with. But they have a much fuller, rounder flavor than those. Since I was using these in a crust, I wanted the flavor to compliment the lime pie I was planning to make. So I reduced the cinnamon and added a bit of brown sugar to Shauna's recipe. This recipe makes enough for a regular nine-inch pie or four five-inch tarts, with a few cookies left over for chef treats. Next time, I'll be making at least a double, if not triple, batch of these. They were that good. It's feels like such a treat to rediscover an old favorite like graham crackers that I haven't had since going gluten-free. And these are so much better. Thanks, Shauna! These would also be really good to make ice cream sandwiches with.
For the filling, I had the Confituras lime curd. I have had this lime curd and their Meyer Lemon curd before, so I knew what a treasure it is. (I made Meyer Lemon curd tartelettes with gluten-free shortbread crust here.)
The Confituras lime curd is a perfect balance of tangy, tart and sweet. It's very challenging not eat it all straight from the jar. Having the curd already made gave me a shortcut (and less time over a hot stove in Austin's triple-digit heat — can I get an amen?) If you want to make your own lime curd, I would recommend this recipe from David Lebovitz.
Given the Texas heat, a frozen pie held great appeal. So I looked to Emily Luchetti's frozen key lime pie recipe. In her recipe, you combine lime curd with whipped cream for the filling and freeze it before adding another layer of whipped cream on top to serve. Simple. And so refreshing.
Note: I realized after writing this that I made a major faux pas. I used a scale for measuring the graham cracker ingredients, but I used cup measures for the filling and topping. So sorry to be inconsistent. But in making the transition to gluten-free baking, I've come to rely on my scale more and more. Different flours can vary widely when using cup measures. You're much more likely to get a good result in gluten-free baking if you use a scale. Next time I make this, I'll measure out the filling and topping ingredients and add those measurements here in ounces.
Frozen pies
Gluten-free graham crackers:
1 teaspoon chia seeds
2 teaspoons hot water
2 1/2 ounces sorghum flour
2 1/2 ounces superfine brown rice flour (I use Authentic Foods)
2 1/2 ounces tapioca flour
2 1/2 ounces sweet rice flour
1/2 teaspoon cinnamon
1 teaspoon baking powder
1/2 teaspoon salt
3 1/2 ounces (7 tablespoons) unsalted butter, cold
3 ounces honey
2 ounces brown sugar
3 to 6 tablespoons cold water
Place chai seeds in a small bowl with hot water and stir together to combine. This will form a gel. Set aside.
In a food processor, combine flours, cinnamon, baking powder and salt. Process to combine.
Cut the cold butter into small chunks (about 1/2 tablespoon each) and put in the processor with the flours. Process in pulses until the butter is incorporated and becomes sandy and pebbly like cornmeal.
In a small bowl, combine the honey and three tablespoons of cold water. Add chia seed paste and stir together until uniform. Add this to the processor and whiz together for two to three minutes to combine. You're looking for the dough to turn into a ball. If necessary, add a little more water, a tablespoon at a time, until it forms a ball.
Remove the dough from the processor, put in a covered container and refrigerate for at least 15 minutes.
When you're ready to bake, preheat the oven to 325 degrees.
Take out half of your dough and place it on a piece of parchment paper. Place another piece of parchment over the top and roll it out between the layers of parchment — this will keep it from sticking. Roll it to about 1/4-inch thickness. Cut into pieces or with cutters. Place on a cookie sheet and bake for 15-20 minutes. (I baked the first half batch on a silpat-lined cookie sheet and the second batch on an unlined cookie sheet and both did fine. No sticking.)
Remove from oven and let cool completely and allow to firm up for at least 30 minutes.
Repeat with remaining dough on another cookie sheet.
For graham cracker crust:
10 ounces graham crackers (about 2 cups + 2 tablespoons)
pinch salt
1/4 cup brown sugar
1/2 cup unsalted butter, melted
Preheat oven to 400 degrees F.
Whiz cookies in food processor until you get uniform crumbles with no large pebbles.
Add salt and brown sugar to processor and pulse to combine.
Add melted butter and whiz together until butter is uniformly incorporated and texture is sandy and damp.
Pour out into a 9-inch pie pan or a bowl (if you're going to divide it into little pies or tarts, like I did).
Press crust into pan with your fingers firmly and evenly.
Bake for 10 minutes until golden. Remove from oven and let cool completely. (I mean completely. It should be cool, not warm to the touch.)
Frozen lime pie filling:
1 cup heavy whipping cream
1 tablespoon sugar
1/4 teaspoon vanilla
8 ounces lime curd (I recommend Confituras)
Whip cream with sugar and vanilla until peaks form.
Gently, fold in lime curd. You want to get it uniformly combined but not deflate the whipped cream. (Here's a video on how to fold, if you want a primer.)
Pour the filling into the crust. Freeze for at least four hours.
For serving:
3/4 cup heavy whipping cream
zest of one lime (preferably organic)
Whip cream until peaks form, and dollop on top of each slice of pie (or tart) and sprinkle with lime zest.
Gluten-free graham crackers adapted from Shauna James Ahern, from her Gluten-Free Girl and the Chef blog. Filling recipe adapted from Emily Luchetti's A Passion for Ice Cream.
Jun 13, 2011
Food Find: Bufalo Bob's Chalupas

It's full on summer now in Austin. Triple digits day after day. We get up painfully early every morning to take our dog for a walk as the sun comes up. He's a Golden Retriever, and even with his summer haircut, he still can't stand to be out in the heat in the later parts of the day. That means he's cooped up inside a lot during the week, so we try to get him out on the weekends for a little adventure. This weekend, we took him to "dog springs," next to Barton Springs pool. This is where folks on the hike and bike trail bring their dogs for a little cooling off and some splashing around. It's a great spot for dog and people-watching, whether you have a dog or not.
I've been going to Barton Springs since I was in college. Maybe it's the smell of Chuy's restaurant occasionally blowing in the breeze, but I always end up craving Mexican food after a good swim and some lounging in the shade at the springs. This weekend wasn't any different. But we didn't really want to load up on a greasy bowl of queso. A friend had sent me some info from the Alamo Celiac group's site with a story about Bufalo Bob's Chalupas. It's just a few blocks away from the springs on South Lamar, across the street from the Bicycle Sport Shop. 
Bufalo Bob's (spelled with one f) is a food trailer serving chalupas made with certified hormone- and antiobiotic-free chicken and bison, and local and organic produce whenever possible. It's not the grease- and salt-fest you're used to. It's low-fat and low-sodium, but full of flavor. These chalupas are fresh and satisfying but with healthier ingredients including hummus, flax seeds, and spinach. I tried the Athenian — a tostada with hummus, flax seeds, green olives, shredded chicken, spinach, onion, tomato, a sprinkle of Parmesan and a spicy salsa. My husband had the Cretian, which was the same tostada with ground bison instead of chicken. 
The best part — the owner's wife is gluten-intolerant so two-thirds of the menu is gluten-free (and clearly marked) and he's very careful to avoid any potential cross-contamination. The primary ingredient that makes the other items on the menu not gluten-free is a special version of his hummus, the Texas hummus, which he makes with Lone Star beer. (His regular hummus contains no beer and no gluten.) One section of the menu is vegetarian, one section is made with chicken and the other section with bison. The chalupas were fresh and tasty and very satisfying, but without leaving you feeling weighed down. One warning, once you bite into your chalupa, there is the inevitable crumble and cascade of toppings, so it's not dainty eating. Just grab some extra napkins.
After a morning out playing in the springs and the sun, we were ready for some shade. Bufalo Bob's is a trailer, but it has a very nice covered and raised deck with picnic tables for diners, which I wish was more common around the food trailers in town. And it's conveniently located next to Bananarchy, so you can grab a frozen chocolate-covered banana for dessert. (Ask for the vegan version if you're gluten-free). It's the perfect follow-up to Bufalo Bob's spicy salsa.
Bufalo Bob's is open Wednesday through Saturday 11am-9pm and Sundays from 11am-7pm. I'll be heading back there for lunch during the work week too.
Bufalo Bob's
600 South Lamar (across the street from Bicycle Sports Shop)
512.662.2801
May 29, 2011
Food Find: Delish Gluten-Free Cupcakes

Gluten-free eating, for me, has also meant much healthier eating. Less processed ingredients and more whole, and organic when possible, foods. That has me feeling and functioning a lot better. That means treats usually come from my own kitchen. I love to bake, but don't have enough time to really indulge in it. So when I do, I want it to be something really good and really worthwhile. Most of the gluten-free snacks or treats I've tried have been frozen, stale, and often, full of gums as thickeners that leave me feeling bad. No thanks. And while some traditional bakeries make gluten-free treats, I'm nervous about cross-contamination.
Before going gluten-free, I tried a cupcake from Delish in downtown Austin. They were good. Really good. But after going gluten-free, I figured I'd have to find my own recipe for a tasty cupcake. Cake is a once or twice a year thing for me, usually. So it hasn't been high up on my list to experiment with just yet. But I kept reading raves about Delish's gluten-free cupcakes. Then I ran across this article from the Alamo Celiac Group outlining the lengths they go to to avoid cross-contamination. I'm not going to repeat the article here, you can read it for yourself. But I was really impressed by the effort they're making to keep their kitchen and gluten-free products free of cross-contamination. I know that if there's flour around, then there's always a possibility of problems. But I really appreciate what they're trying to do. But none of that would matter if their gluten-free cupcake tasted like cardboard, like most gluten-free cupcakes.
I had their gluten-free vanilla cupcake freshly crowned with their vanilla frosting this weekend and I was blown away. I think it was the best cupcake I've ever had, even compared to those full of gluten. I bought two. I had the first one, and then stared longingly at the second for the rest of the evening. I tried to save it for dessert that next day, but didn't make it. I gobbled it up after breakfast. My husband is usually the one who's in the kitchen swiping the baked goods, but this time, I wouldn't let him near these precious treats. I wish I'd gotten a picture of them for you. But I was too greedy. I'm not even sorry. Their cupcake was moist and incredibly flavorful. I love vanilla and this one is full of vanilla richness. And they frost their cupcakes on demand so it's perfect. Seriously, that frosting is like crack. Beware.
I also asked the gal behind the counter what ingredients they used — expecting to hear xanthan or guar gum. But no! No gums!
So if you're eating gluten-free and get a hankering for an indulgence, try Delish. This is the cupcake by which I will now measure all others.
(And just for the record, this is my own personal experience with Delish as a paying customer.)
Delish
203 West 3rd Street, Austin
512.473.4118
May 11, 2011
Chile Rub

Chiles: smoked serranos, amarillos, ancho, chipotles
A while back, a friend gave us a gift of a jar of magic. He had painstakingly smoked some chiles, then dried and blended them. At first, we were using it on everything, on steaks for the grill to make tacos, on eggs for breakfast, on roasted veggies. It was so good. I hounded him for the recipe but he hadn't written anything down. He was just winging it and the results were incredible. It had just the right amount of complex heat without being overwhelming, with a layer of smokiness underneath and just a touch of salt. As we got to the bottom of the jar, I started hoarding it. I wanted to take a stab at making some more. We were hooked, we couldn't be without this stuff.
So I decided to try to replicate it. I have to start right off with a confession. Even though my husband has a smoker in the backyard and would love nothing better than to spend a day tending it, we just didn't have time for that this go round. So I knew I'd be looking for an express version using already smoked and dried peppers. 
I started out at the Savory Spice Shop. Have you been there yet? It's a goldmine. Owner Karen Aboussie is a gracious and knowledgeable hostess. You can sample any and every herb and spice blend in the house. And she'll tell you to just dust it off your hand into the floor when you're done! At first, it seems very bad manners to make a mess in this pristine new shop, but if you're like me, your curiousity soon gets away from you and your tasting everything in site. It's a delightful way to get inspired. They have everything from vanilla beans to smoked salts to grill blends to freeze-dried corn (which is addictive and great on a Mexican salad as a crouton). Just be forewarned: you'll want to spend some time perusing the shelves. I thought I'd just drop in to pick up a few things and I couldn't tear myself away. They sell spices in any kind of quantity you want, by weight. You can get just a teaspoon in a little plastic ziploc, or you can buy one of their glass bottles.
I've long been a fan of buying bulk spices. They're fresher and more flavorful when you buy in bulk because of faster turnover. And, you can get only the quantity you need. So you won't have a bottleful of something sitting around if you only need a teaspoon. I keep my spices in tins with clear lids. They have magnets on the bottom which stick to the side of the fridge. I love being able to see what's in them all the time. They make for a kind of abstract color swatch art in the kitchen. 
Even though I'm in the habit of buying fresher bulk spices at the market, I was impressed by how much fresher the spices were at Savory Spice Shop. There is a noticeable difference. And I hit the jackpot looking for dried chiles there. They have a whole wall of them. I got smoked serranos, amarillos, anchos, two kinds of chipotles and aleppo pepper flakes. I also got oak-smoked salt and hickory-smoked salt. The hickory is more assertive, so use more of that if you want more smoke flavor.
Two cautions on this job: if you have contacts, be sure to use gloves when handling the peppers or you'll be crying (literally) later. And keep the kitchen fan on when you grind these in your spice grinder. I opened the lid one time and got a face full of chile dust. I started sneezing and couldn't stop.
This batch makes a small quantity, a little less than a cup. Next time, I'll be multiplying it and making much more.
Tip: to clean your spice grinder after use, grind some rice into powder in it and then wipe it out. This will clean it off and remove any spice or chile flavors or scents that might remain. 
Chile Rub
1 dried amarillo chile
1 ancho chile
6 smoked, dried serranos chiles
2 chipotles
1 teaspoon aleppo peppers
3 teaspoons oak-smoked salt
1 teaspoon hickory-smoked salt
Using gloves, remove the stems and seeds from the whole dried chiles. Cut them into pieces.
Using a spice grinder (coffee grinder used only for spices), grind each individual chile's pieces about 8-12 pulses. I like having some big flakes mixed with smaller bits, so keep an eye on it as you grind to get it the way you like.
After grinding, put the ground chiles, aleppo pepper flakes, and salt in a bowl. Stir to combine and store in a jar.
Yield: a little less than a cup.
Big thanks to Matt for his incredible chile blend and the inspiration!
Mar 25, 2011
Austin Bakes for Japan Bake Sale 4/2

Feed your sweet tooth! Austin Bakes for Japan, a fundraising bake sale to help survivors of Japan's earthquake and tsunami, will take place Saturday, April 2nd, from 10am – 2pm. Austin bakers and bloggers are taking part in the bake sale to benefit AmeriCares. Goods will be sold by donation, so buyers can pay what they can. Bake sale locations below.
Austin Bakes for Japan is part of a national movement of bake sales for Japan on April 2 with a goal of raising $10,000. Bake sales will be taking place the same day in 23 other U.S. cities including Boston, Washington, D.C., New York, Portland, San Francisco and Seattle.
Austin bake sale locations:
Downtown: Woof Gang Bakery Austin, 1204 N. Lamar Blvd., Austin
North Central: Foreign & Domestic, 306 E. 53rd Street, Austin
South: Hotel San Jose, 1316 South Congress Avenue, Austin
East: Nomad Bar, 1213 Corona Drive, Austin
West: Shops at Mira Vista, 2785 Bee Cave Road, Suites 336 & 341, Austin (10am-5pm)
If you're interested in providing baked goods or volunteering, contact Kathryn Hutchison at austingastronomist@gmail.com.
P.S. I'll be donating gluten-free goodies to the bake sale. Maybe this chocolate almond toffee?
Mar 6, 2011
Soba Noodles with Chicken and Almond Maple Sauce

The recent earthquake and tsunami in Japan have left me stunned and with an aching heart. I haven't yet made my way to Japan, but it has long been on the top of my travel wish list as a destination and culture that fascinates me. My thoughts and prayers go out to everyone there in their recovery.
Soba noodles are one of my favorite Japanese comfort foods. Soba are usually made from a mixture of buckwheat and wheat flours. Buckwheat, contrary to its name, is not a type of wheat, and is gluten-free. But most soba noodles also contain a bit of regular wheat flour as well to make them less fragile. I used Eden Selected 100% buckwheat soba noodles, available locally at Whole Foods. I'm still on the hunt for a certified gluten-free soba noodle, which Eden's is not, but I have used these repeatedly and have had no problems.
When I went to Seattle, Lara Ferroni turned me on to the cookbook, Lucid Food by Louisa Shafia. She said she was inspired by the gorgeous, natural photography by Jennifer Martiné. I can see why. This is a book you can get lost in looking at the photographs. Kale has never looked so sexy. I was also charmed by the hand-drawn graphics embellishing the book.
This book seduces you with its storytelling, all the while teaching you to "green your cuisine" and eat in more sustainable ways. I love the introduction... Shafia describes the magic of a power outtage in New York City caused by a multistate blackout. Disconnected from trains, computers, and air conditioning, New Yorkers took to the streets for an impromptu party on the sidewalk. With their tvs turned off, neighbors chatted under a full moon and enjoyed the simple pleasures of a summer evening.
One of my favorite recipes from Lucid Food is this one for soba noodles with an almond butter sauce sweetened with maple syrup. Shafia makes it with tofu. I'm off soy for now, so I subbed some roasted chicken. The soba noodles have a soft, nutty, earthiness that is bathed in a very seductive sauce. It's made with a base of almond butter sweetened gently with maple syrup and sesame oil.
The sauce also includes a shot of soy sauce for savory saltiness. As I mentioned, I'm off soy for now, so I found a substitute that works well in this kind of context as a seasoning. It's Coconut Secret brand raw coconut amino. It is a gluten-free, soy-free, organic, coconut-based amino seasoning sauce. It also has much less salt than traditional soy sauce. It's raw, vegan, gmo-free, and contains 17 amino acids. I found it at Whole Foods, next to the soy sauce.
Along with the sobas and almond butter sauce, these noodles have snap peas for a fresh, green crunch. One of the things I love about this recipe is that Shafia pours the hot noodle water over the peas in a colander (also draining the noodles) to quickly cook the snap peas just enough. I also added some strips of red bell pepper too.
One note: the Eden Selected web site recommended cooking these 100% buckwheat sobas the traditional Japanese way to create a firmer noodle. This is easily done by shocking the noodles while they are cooking. Bring your water up to a boil, add the noodles, stir, and then let them come back up to a boil. As soon as the water begins to boil, add about 1/2 cup of cold water to the pan to stop the boiling. Repeat this one or two more times until the noodles are cooked through — when the inside of the noodle is the same color as the outside and they are still firm yet tender to the bite. This will happen quickly, in about 5-6 minutes.
We liked this sauce so much that I increased the proportion of sauce to make a little more of it. You can serve the extra at the table to add as you like.
Soba Noodles with Chicken and Almond Maple Sauce
1 pound roasted chicken meat, shredded
sauce:
3/4 cup almond butter
2-4 tablespoons soy sauce or soy-free Coconut Aminos
6 tablespoons maple syrup
2 tablespoons toasted sesame oil
1 tablespoon fresh ginger, minced or grated
2 cloves garlic, minced or grated
2 tablespoons rice vinegar
noodles:
3 cups snap peas, ends trimmed and sliced diagonally
8-12 ounces soba noodles
1 red bell pepper, sliced
3 scallions, thinly sliced
one bunch cilantro
2 tablespoons toasted sesame seeds
chili oil for serving
Make the sauce: Combine the almond butter, soy sauce (or aminos), maple syrup, sesame oil, ginger, garlic, and rice vinegar. Whisk together until it becomes a cohesive sauce. Set aside.
Place the sliced snap peas in a colander in the sink.
Fill a large pot with water, sprinkle in a pinch of salt and bring to a boil. Add the noodles, return to a boil. As soon as the water returns to a boil, add about 1/2 cup cold water to stop the boiling. Let it come back to a boil again, and repeat with another 1/2 cup cold water. Repeat one more time, if necessary, until noodles are cooked through. This should take only about 5-6 minutes.
When the noodles are completely cooked, drain them into the colander with the peas. The hot water will cook the snap peas just enough. Rinse the noodles and peas in the colander briefly with cool water. Drain and then pour them out into a large serving bowl.
Add the shredded chicken, bell peppers, cilantro and scallions to the noodles and peas. Drizzle with about half of the sauce. Toss together with tongs until all of the noodles are coated with the sauce.
Before serving, sprinkle with toasted sesame seeds. Serve with chili oil and more almond butter sauce to add as you like at the table.
Serves 4.
Adapted from Lucid Food by Louisa Shafia.
Feb 24, 2011
Gluten-Free Meyer Lemon Curd Tartelettes

This is the time of year in Austin when Spring is on our doorstep. While we may still get a few nights around freezing in March, we're also having lots of bright, sunny days near 80 degrees and the trees are starting to bud out. It's time to start thinking about what's going into the garden in the next few weeks. But if you don't live in Texas, you might still be facing that last bit of chill. This little tart will give you a taste of Spring with its bright, sunny flavors. 
Last weekend at the farmers market, I spotted Meyer Lemon Curd at the Confituras booth. They had mentioned it was coming weeks before and so I'd been keeping an eye out. I'm so glad I didn't miss it. I tried a sample... not because I questioned whether or not to get some, but because I couldn't wait to taste it. It knocked my socks off. A Meyer lemon is a cross between a lemon and an orange, with a sweeter, less acidic, rounder flavor than an ordinary lemon. It is one of my favorite flavors. Like most citrus, you'll usually find them in season in late winter. But they taste like bright sunshine to me. Just the antidote to too many chilly winter days. I have to say, I've had lemon curd before, even Meyer lemon curd. But none has come close to Confituras. It is the perfect balance of tangy, bright and sweet. This is the standard by which all other lemon curds will be measured in my book from now on.
Citrus curd is made by combining egg yolks, sugar, juice and sometimes butter. Sort of a custard. It's the perfect filling for a tart or to use as a custard in the layers of a trifle with pound cake or angel food cake and whipped cream.
Confituras is a small, local, preserve maker run by Stephanie McClenny. She recently won a Good Food Award in San Francisco for her Texas Fig Preserves with honey, balsamic and bay leaves. Her Salted Caramel Pear Butter is another one of my favorites. I sent jars of her treats to friends over the holidays as gifts. In Austin, you can find Confituras at the Saturday farmers markets and at Breeds, Antonelli's cheese shop, and Con'Olio. Outside the Austin area, you can order online.
I managed to snag two of the last jars of Meyer Lemon Curd at the farmers market last Saturday. (If I hadn't already blown most of my wad of cash on veggies and steak, I would have bought more.) I haven't gotten far enough into the world of gluten-free baking to find a favorite pie or tart crust recipe yet. So I did a little research online and decided to try this recipe for Cannelle et Vanille's shortbread crust. Her photographs are so breathtaking and inspiring. And she's a great source for gluten-free recipes now too. I can't wait for her cookbook to come out.
I haven't yet tried making my own curd (maybe one day Confituras will teach a class???), but here is one I'd like to try, if you want to make your own.
One ingredient note: I've been experimenting with different gluten-free flours for baking. And like many gluten-free bakers, I like Authentic Foods superfine brown rice flour because it's so much smoother and finer than others. But I tried one batch of this shortbread crust with their superfine flour and another batch with the heartier Bob's Red Mill stone ground brown rice flour. I liked the stone ground batch better for this shortbread because it actually enhances the sandiness in the texture. It came the closest to replicating the flavor of my old favorite traditional shortbread recipe. I was afraid that I would never be able to have a gluten-free version of that crumbly, sandy, flaky, vanilla shortbread flavor with gluten-free flours, but I was wrong. All the satisfaction, but none of the gluten. This will be my go to recipe when it's time to start making (gluten-free) holiday shortbread this year. 
Equipment note: I tried these little tarts with individual 5-inch tart pans and also with these tiny, two-bite tart pans. For a very rich filling or in this case, a tart filling, I preferred the tiny tarts. The larger size were too big for one person to finish on your own.
Be sure to remove your butter ahead of time to allow it to soften a bit on the counter before mixing.
And look for Meyer Lemon Curd again this weekend from Confituras. I'm already craving more.
Meyer Lemon Curd Tartelettes with Gluten-Free Shortbread Crust
filling:
2 8-ounce jars Confituras Meyer Lemon Curd
topping:
8 ounces heavy whipping cream
1-2 tablespoons powdered sugar, sifted
1 teaspoon vanilla
gluten-free shortbread crust:
2 sticks (225 grams) butter, softened
1 1/2 cups (110 grams) powdered sugar, sifted
zest of one organic Meyer lemon
1 teaspoon vanilla
1 1/3 cups + 1 tablespoon (170 grams) Bobs Red Mill stone ground brown rice flour
1 cup (110 grams) cornstarch
1/4 cup (30 grams) tapioca starch
pinch of salt
Measure out your brown rice flour, cornstarch, tapioca starch and salt and whisk together in a bowl. Set aside.
Mix together the softened butter and powdered sugar until the butter is light and fluffy.
Add the lemon zest and vanilla. Mix again to incorporate.
Add the flour mixture half at a time and mix until it comes together. Form the dough into a ball with your hands. Break off pieces (between one and two tablespoons for the tiny tart pans) and press into your tart pans. Place tart pans on a baking sheet and cover with foil or plastic wrap. Refrigerate for at least one hour.
To bake, preheat oven to 375 degrees. Remove tart pans from the fridge and prick each crust with a fork to allow steam to vent. (The tarts may still puff up while baking. You can remove them from the oven mid-way through baking and prick them again. They will lay down again after cooling. But be sure to pre-bake them like this before filling if you're using a light filling. If you're making them for a heavier fruit filling, they should be fine baking with the fruit.)
While these are baking, prepare your whipped cream topping. Whip cream (with a whisk for a little workout or a mixer) with powdered sugar and vanilla until soft peaks form. Cover and refrigerate.
Bake for 25-30 minutes until the edges begin to get a little golden. Remove from oven and let cool. (Note: these can be made a day ahead and then filled just before serving. I actually preferred them that way.)
Just before serving, fill tarts with cold Meyer Lemon Curd. Top with a spoonful of whipped cream and serve immediately.
Yield: 20 tiny tarts or 6 to 8 5-inch tarts
Adapted from shortbread crust recipe by Cannelle et Vanille. 
Feb 11, 2011
Valentine's Treat Ideas

I have Valentine's in my blood. Literally. My great grandparents last name was Valentine. My great grandmother was Ruby Valentine, no less! I almost got named Valentine as my first name. Dodged a bullet there. But I've always thought it would have made a great middle name.
This time of year, I hear lots of folks complaining about the commercialism of what have come to feel like manufactured holidays. But it's easy spread a little heartfelt affection, whether you're treating a friend, a sweetie or yourself, with some homemade goodness. These treats are all gluten-free so they are safe for everyone. Share the love!
Chocolate Cups flavored with coffee or peppermint (gluten-free)
Peanut Butter Chocolate Cups (gluten-free)
Chocolate Almond Toffee (gluten-free)
Chocolate Almond Bars (gluten-free)
Brownies (gluten-free)
Feb 1, 2011
Gluten-Free Brownies

I love to bake. And I've spent years experimenting with recipes to find the one version of something that stops me in my tracks. The one that means the search is over. The one I will want to continue making forever. Like these chocolate chip cookies. And this shortbread. And this crumble. And these brownies. These are holy grail recipes. I would say that they are the recipes I would grab if the house caught on fire. But I think I know them so well, I wouldn't need to. I've made them so many times I can remember them.
But going gluten-free means redefining those old favorites so that I can still enjoy them. This will take time and experimentation. But I'm working on it. These brownies are the first to go gluten-free. They seemed like a good candidate. They are so easy to make, you don't even need a mixer. They are mostly eggs and chocolate and butter with a little flour to keep it all together. As a gluten-free flour, I used equal parts brown rice flour and tapioca flour. A lot of gluten-free recipes you see have combinations of a long list of alternative flours and even gums to hold things together. You don't have to fuss with all of that here. Just the two flours. One note, though: rice flours can be gritty if they are not very finely milled. I tried several brands. I kept seeing recommendations for Authentic Foods brand rice flours because they are milled superfine. I know, it's an extra step to have to mail order your rice flour, but it's truly worth it to avoid the grittiness. Other alternative gluten-free flours would probably work here as well, but this one works for me. Experiment and let me know what works for you.
These can be made in a square baking pan or as mini or full-size cupcakes. I've made them for several parties as cupcakes. If you're using a square baking pan, be sure to spray it and then line it with a strip of parchment hanging over the sides (seen here) for easy removal from the pan after baking and cooling.
The recipe below is for straight up, traditional brownies. For a spicy Mexican version, you can add 1/8 teaspoon chipotle powder, 1/2 teaspoon cayenne powder and 1 teaspoon cinnamon to the flour and give it some heat. These are my husband's favorite.
Substitutions note: I've also experimented with making these dairy-free, using Earth Balance baking sticks (trans fat free!). I'm hard pressed to tell you which I like better. The margarine gives them a little more chewiness in the texture which I love. But the butter is a little richer. I made batches of each and asked friends to give me a favorite. Even my 13-year-old buddy, Jackson, had a hard time picking a favorite, although he put in a good effort tasting one, then the other, then the first one again... Either way, you'll have fudgy brownies with chewy edges and big chocolate flavor.
Most important note: these are best made the day before serving. They'll be good after cooling from the oven, but the flavors develop overnight. They will be spectacular the next day. So make them a day ahead.
Gluten-Free Brownies
1/2 cup + 1 tablespoon Authentic Foods Superfine brown rice flour
1/2 cup + 1 tablespoon tapioca flour (or tapioca starch, same thing)
8 ounces 60-70% bittersweet chocolate, chopped
2 sticks unsalted butter (1 cup or 228 grams)
4 eggs
1/2 teaspoon salt
1 cup sugar
1 cup brown sugar
2 teaspoons vanilla
Preheat your oven to 350 degrees.
In a small bowl, measure out your brown rice flour and tapioca flour and stir well to combine. (If you're making the Mexican spicy version, add the spices to the flour and stir together.) Set aside.
With softened butter or cooking spray, grease a square baking pan (mine is 9 1/2 x 9 1/2 inches when measured across the top). Now cut a strip of parchment paper or foil a little narrower than the width of the pan and long enough to hang over on both sides. Place the foil/parchment in the pan and press it against the sides. It will stick to the pan. Now grease the paper as well. This seems fussy, but will insure that you get these babies out of the pan in one piece. The overhanging sides will act as a sling to lift out the brownies -- only when they are completely cool! You hear me!
In a cereal or soup-sized bowl, put the chopped chocolate and the butter. Microwave on 50% power in 30-second increments until the butter is completely melted. The chocolate won't look melted, but stir them together and it will melt completely. Set aside.
In a large mixing bowl, whisk or stir together the eggs, salt, sugars and vanilla. (I use a giant whisk for this. Seen here.)
Add the melted chocolate to the egg mixture and whisk/stir together. Add the flour and gently whisk together completely.
Pour the batter into the prepared pan and bake for about 45 minutes, until the top is crackly and shiny. (You want fudginess, so the toothpick test doesn't really work here.) If you make these as mini-cupcakes, bake approximately 20 minutes. For full-size cupcakes, 30-40 minutes, depending on how fudgy you want them.
Let cool completely. COMPLETELY. Then, if you can't stand it, using the sling you made with foil/parchment, lift the brownies out in one piece, slice and eat. But if you are made of stronger stuff than most, cover the cooled brownies in the pan and refrigerate or let sit on a cool counter overnight. The next day, use the sling to remove them, peel off the parchment/foil, slice and enjoy.
From the square pan, these can be cut into 9 giant brownies or 12-16 smaller ones. They are very rich so a little goes a long way. (Yields 12 full-size cupcakes or 24 minis.)
Adapted from David Lebovitz and Nick Malgieri.
Jan 25, 2011
Shepherds Pie with Lamb and Bison

Baby, it's cold outside — even in Austin. The chill has had me craving a big bowl of something warm, comforting and soul-satisfying. One of the things about giving up gluten is that you end up craving those warm, squishy, bready things as comfort food. I've been working on finding dishes that are just as satisfying, but without the gluten. This is one of them.
This is a shepherd's pie made with ground lamb for flavor mixed with ground bison to make it healthier. (Did you know grass-fed bison has more omega-3s than salmon? Find out more.) Mix in plenty of whatever vegetables and herbs you like and top it with mashed potatoes. A small serving of this is quite filling so it's great for feeding a crowd and it's something the whole family will enjoy and be comforted by.
I've made this several times in the last few weeks and every time my husband says, "I could eat this every night" (and then he does). It keeps well in the fridge for leftovers or you can also freeze it for later. (This would be a great thing to make in a loaf pan and freeze to give to someone in need of some homemade love.)
This recipe is one of those that's really just a guideline. If you don't like lamb, use beef. You could add red wine or more or less broth, depending on how soupy you want it. You could make an all veggie version. You could put in whatever veggies and herbs you like. (I love the rosemary with lamb.) And you could also add some cheese to the mashed taters for another layer of gooey goodness. Run wild. Make it your own. You can't go wrong. And it'll make you feel cozier just knowing it's there in the fridge, waiting for you.
Recipe note: I used a lot of rosemary. We have a giant rosemary bush in our garden. It's the kind that grows up more than creeping horizontally. It takes up less garden real estate that way. But it seems to be a bit milder in flavor than other varieties, so I use more of it. If you're using rosemary, taste it first and decide how much you want. Also, I went with a non-dairy version here to lighten it up, but you can make your mashed potatoes however you like — use broth, sour cream, butter, whatever.
Shepherd's Pie with Lamb & Bison
1 1/2 to 2 pounds potatoes, chopped (I buy organic and leave the skins on)
1/2 cup butter or nondairy butter substitute or chicken broth or 1/4 cup olive oil
2 tablespoons olive oil
1 large onion, peeled and chopped
2 cloves garlic, peeled and chopped
1 pound ground lamb
1 pound ground bison
4 5-inch stalks fresh rosemary, leaves stripped from stems and chopped
1 to 2 teaspoons hot, smoked paprika
1 1/2 cups carrots, chopped
1 1/2 cups zucchini, chopped
1 cup frozen peas (you don't even need to defrost them)
1 orange or red bell pepper, seeded and chopped
1/2 to 1 cup beef broth (Pacific makes an organic, low-salt, gluten-free one I like)
2 tablespoons corn starch
Preheat your oven to 350 degrees.
Have a casserole dish handy. I'm not going to tell you exactly what size, because it depends on how you like your shepherds pie. You can make it in a wider, lasagna-style pan, if you want thinner layers of filling and potatoes. Or you can make it in a smaller, deeper pan, if like us, you want thick layers. We have a very old oven-proof stoneware pan that my husband says his grandmother used to use to make banana pudding. What could be better than that?
Start with your potatoes. Fill a large pan with water and bring to a boil. Add your potatoes and bring back up to a boil. Then, lower heat to medium or medium-low (so your pan doesn't boil over) and cook until fork tender. (This will take about as long as it takes you to prep the rest of the meat and veggies.)
In a large skillet, sauté the onion in olive oil over medium heat for several minutes until translucent. Add the garlic and meat. Increase the heat a bit and let the meat brown all over. The bison is going to be very lean. But if your lamb gives you more fat than you want in the pan, you can spoon some out at this point.
Add your vegetables and rosemary and let cook until veggies are just tender, but not too soft. It's better if they still have a little snap. This is going to go in the oven and cook a little more, so keep them a bit undercooked.
When the potatoes are tender, drain them and mash them with a potato masher or even a stick blender, if you want them really fluffy. Add the butter or whatever you using to make your mashed taters. Combine well. Season with salt and pepper to taste.
Place your hot meat and veggie filling into your casserole pan. Then top with mashed potatoes. Use a spatula or spoon to spread it out evenly over the top. Bake in oven for 20-30 minutes until completely heated through.
Serves 6-8.
Jan 21, 2011
Going Gluten-Free

The news
It's time to come out of the closet...I've gone gluten-free. After several years of increasingly bad health, painful stomach cramps and other horrible digestive issues, increased migraines, fatigue, debilitating joint and muscle pain, memory loss, foggy headedness, clumsiness, loss of coordination, walking into walls... the list goes on, I decided to go gluten-free temporarily to see if it made a difference. Mind you, this was after years of doctors telling me that I had IBS and handing me another prescription. None of them seemed concerned by the cause of all these symptoms. I didn't want to medicate the problem, I wanted to solve it. Most of all, I wanted to be healthy again. I wanted to be me again. I also did an independent test to see what those results would be. They came back positive for gluten as the culprit. So I wanted to know for sure.
With fantasies of one day going to pastry school, I didn't want going gluten free to be the answer. But I had to know. I could not continue feeling so bad and compromising so much of my life. I decided to do a 3-6 month gluten-free experiment. Mostly, I was hoping to rule it out, even though that would leave me with no obvious solutions. Going gluten-free was not as easy as I thought. It took months of research and reading and investigating to begin to understand how to eliminate my gluten exposure.
But it worked. I've gotten better. Much, much better. Initially, I was kind of bummed. No more of my newly discovered favorite pizza at Little Deli. No more traditional baking. No more of my all-time favorite chocolate chip cookies or shortbread. No more food in Asian restaurants using soy sauce in their foods and marinades. No more treats from Rebecca Rather's Rather Sweet Bakery. No more naan bread in Indian restaurants. No more going into a restaurant and thinking I have the liberty of ordering what I'm in the mood for. Now I have to ask if they have even a single safe item I can eat and hope it's not cross-contaminated. No more spur of the moment dining out with friends (I have to do research first to see if it's safe) or be limited to the short list of places I have already checked out and I know are safe. Ugh.
OK. Now that I've gotten that out of my system... Here's the good part. I. FEEL. BETTER. So much better. It's a slow road back and it's not over, but almost all of those symptoms listed above are gone or going. And it feels so liberating to start feeling better and leave some of those symptoms behind, that I can let go of all those favorite foods that were making me sick and be glad to know how to feel better. I've also worked with a nutritionist to educate myself and improve my healing and recovery.
The blog
I started this blog as a way to continue to learn about food, to share recipes and to improve my photography skills. For years, I used to produce a series of recipes cards for the holidays to send to friends. It was a fun way of sharing the recipes I had tried throughout the year and that had become favorites. I would experiment, sometimes for years, with different versions of a particular dish, until I found THE ONE. You know, the one you know you'll never want to give up. The recipe you'll reach for over and over and you know your search has ended. Like the chocolate chip cookie recipe or the shortbread recipe that I mentioned earlier. It was fun to find those and share them with friends.
But I always had trouble limiting myself to the dozen or so recipes that I had to narrow it down to each year. Even with that number, the production of all those cards was quite something. This blog was a place I could share many more of those recipes that became favorites, but I could do it all year long. And they'd be archived and available anytime on the web. No more remembering recipe cards or making a list. I even use the blog archive on my iPhone at the grocery store to look up an ingredient list to make sure I'm not forgetting something. I hope other people do too.
So now, I'm going to be taking a fork in the road. I'm going to leave up my old recipes for those who can enjoy them. But I'll be making things gluten-free from here on out. For many recipes, this won't make any difference or not much of one. Sometimes the solution is to simply sub in gluten-free tamari for soy sauce or using gluten-free pasta instead of wheat pasta. So I'm glad I can still share recipes with everyone. Where it will really be different is in the baking. I'll be exploring a whole new world of baking gluten free. And I'll also be working of making gluten-free versions of those old baked favorites already in the archive.
This process has made me realize that even though I thought I knew a lot about food and was making healthy choices, I still have so much more to learn. Food is fun. But it can also be nourishing. It's supposed to be anyway, if we make the right choices.
I also have to share how incredibly inspired I have been by reading the books and blog of Shauna James Ahern, the Gluten-Free Girl. I can only aspire to her eloquence and her open-heartedness in her life and in her explorations of good eating. She has boldly and bravely and gracefully forged a path that makes the transition for others like me so much easier. Thank you, thank you, thank you.
I have also been overwhelmed and inspired by the stunning photography of Aran Goyoaga of Canelle et Vanille. She has recently made the transition to going gluten-free and with such style and grace, I can't help but be completely seduced by her images and recipes.
Locally, blogger and gluten-free chef Jessica Meyer of ATX Gluten-Free has been a wealth of local information and tips on eating gluten-free in Austin. She's putting together a gluten-free pizza fest on her blog in February. I can't wait. Pizza is the thing I miss most.
And I have to give a shout out to my buddies Kim and Leslie. They have both gone through this transition ahead of me and shared valuable information and resources that made things so much easier for me. Bless you both. And thanks to my sweetheart for so gracefully giving up the gluten in our house and always being so incredibly supportive. I am a lucky girl.
OK. This is way too much about me. Let's get back in the kitchen. More tasty treats coming up.
P.S. For more info on symptoms related to gluten sensitivity and celiac:
• symptom guide from Gluten Free Works
Jan 16, 2011
Chocolate Cups

Here's the follow-up recipe to the last post on dark chocolate peanut butter cups. Since these are solid chocolate, not filled, they are much faster and easier to make. You melt the chocolate, flavor it, top it, and refrigerate to set. Easy. There are two flavor options below, coffee chocolate cups and mint chocolate cups. There are endless flavor possibilities. Let me know if you come up with one you like. I'm thinking Nutella-filled chocolate cups would be tasty. These make great gifts presented in candy boxes or little cellophane gift bags. Be sure to make extra for yourself. These disappeared from our house pretty quickly.
Since these were solid chocolate, I went with a smaller candy paper cup than for the peanut butter-filled chocolate cups. Make them however you like, just know that you're quantity will be less with larger cups.
I use mini-muffin pans for structure until the chocolate cups have set. Otherwise, the floppy paper cups full of melted chocolate would be a big mess.
Coffee Chocolate Cups:
24 ounces Ghiradelli 60% chocolate chips
2 teaspoons instant coffee crystals
1/4 teaspoon salt
2 tablespoons cocoa nibs (or chocolate-covered cocoa nibs), finely chopped
#4 candy paper cups with 1-inch base
mini-muffin pans
Mint Chocolate Cups:
24 ounces Ghiradelli 60% chocolate chips
2-3 teaspoons mint extract
1/4 teaspoon salt
1 ounce peppermint candy or candy cane, finely chopped
#4 candy paper cups with 1-inch base
mini-muffin pans
Prepare your pans: separate candy papers and place them in the mini-muffin pans. You'll need approximately 24.
Choose the flavor you want to make from the ingredient options above and then proceed...
Melt your chocolate in a double boiler or a saucepan about 1/3 full with simmering water with a large bowl placed over top. Make sure that your bowl is larger than the saucepan and that the bowl is completely dry on the inside (any water droplets will cause the chocolate to seize).
Melt the chocolate in the bowl or double boiler until it melts. Take your time here and stir it occasionally to melt it evenly. When the chocolate is completely melted, remove the bowl from the simmering water. (You can also melt the chocolate in a microwave. I often do this with small quantities of chocolate. But sometimes larger quantities can be harder to get melted all the way through, so you might try it in two batches.)
Stir or whisk in your flavoring (coffee or mint extract) and salt. Stir well to make sure your flavoring is completely incorporated.
Pour the flavored, melted chocolate into the candy papers in mini-muffin pans. I found this easiest to do with a tablespoon.
Sprinkle the tops of your filled chocolate cups with either the cocoa nibs or peppermint candies, depending on which flavor your making.
Place the mini-muffin pan in the fridge for at least an hour to set. Keep refrigerated until ready to serve. You can remove them from the fridge 15 minutes before serving to let them soften just a bit before eating.
Yield: approximately 24 candies per recipe.
Adapted from David Lebovitz.
Jan 9, 2011
Peanut Butter Chocolate Cups

My husband is the chocolate fiend in the family. Over time, he's developed a taste for finely crafted dark chocolates from companies like Theo, Dagoba, Vosges, Dolfin and Madecasse. But he's never gotten over his love of the mass produced Reese's peanut butter cups. So over the holidays, I thought it might be fun to experiment with a homemade dark chocolate version with a less sugar and more substantial chocolate and natural peanut butter flavor.
Once you start making these, you'll think of plenty of other flavor possibilities. I also made some solid chocolate cups flavored with coffee and another batch flavored with mint. (See them all in the photo above.) Those are much simpler and faster to make since they don't have a separate filling. I'll post the recipe for those next time.
The peanut butter cups are relatively simple to make and don't really even require any baking. You simply melt your chocolate, coat a candy cup with it, fill it with peanut butter filling, flatten that down a bit to make it even, and then finish with more chocolate on top. The only fussy part is applying the chocolate to the candy papers. It takes a little time, but once you taste the end product, you won't ever want to stop.
I used Scharffen Berger's 70% chocolate, MaraNatha Natural No-Stir (to avoid oil separation) creamy peanut butter, and #5 size candy cups — these have a 1 1/4 inch base and 3/4 inch walls. I ended up buying a couple of extra mini muffin pans to use for these because it was so much easier to make them with the candy paper cups sitting in the muffin pan for structure. Even though these papers are a little smaller than a mini muffin, the pan's walls give you needed structure when you put the melted chocolate into the empty papers. You can find several different sizes of candy papers. The #5s were just right for plenty of chocolate and enough height for plenty of peanut butter too. I noticed that the candy papers were a lot cheaper and the package contained a greater quantity of papers for the price, compared to mini muffin baking cups. Since the candy cups don't have to go in the oven, they are probably a little thinner. In Austin, you can find an assortment of sizes at All in One Bakeshop on 183.
As long as you keep these in the fridge, you won't need to temper the chocolate. Professional candy makers temper chocolate (melting it to a specific temperature, 88 to 90 degrees F or 31 to 32 degrees C, so that the chocolate melts but enough of the fat crystals are maintained so that when the chocolate cools, it has that silky smooth texture and won't have any white powdery "bloom"). But I wanted to see if I could get away with keeping it simple and making these without tempering. I followed David Lebovitz's technique for coating the candy papers with melted chocolate and then letting them set in the fridge. It worked perfectly. Once you've tried this, you'll realize the possibilities are endless. (See David's recipe for a salted caramel and peanut version.)
These make great holiday treats and gifts and were very enthusiastically received. So be sure to make plenty. You'll want enough to treat yourself too.
Note: I discovered that the amount of powdered sugar can vary depending on how wet or dry your peanut butter is and how firm you want your filling, so I'm giving you a range here. Try it yourself and see what you like.
Peanut Butter Chocolate Cups
36 ounces Scharffen Berger 70% chocolate
3 cups MaraNatha natural no-stir creamy peanut butter
1 1/2 - 2 cups powdered sugar
2 teaspoons vanilla
1 tablespoon large crystal sea salt
1/2 cup roasted, salted, skinless peanuts, chopped
72 #5 candy cup papers
mini-muffin pans
Start by preparing your pans. Separate the candy cup papers and place them in your mini muffin pan(s).
Chop your chocolate bars into pieces as small as you can get them. I usually find it easiest to melt chocolate in the microwave, but for this quantity of chocolate, it was too cumbersome and didn't melt evenly. So I did it over an improvised double broiler. In a medium or large pan, bring 4-6 cups of water to a boil. Turn it down to a simmer and place a large metal or glass mixing bowl (that is completely dry so that the chocolate won't seize) that will fit on top of the pan without falling into it, over the top. Place your chopped chocolate into the pan and stir it as it begins to melt. This will take several minutes. Once all the chocolate has melted, you can turn the heat off, but keep the chocolate sitting over the hot water as it will keep it melted while you work. 
I used a teaspoon to place a little dab of melted chocolate into each candy paper cup sitting in the mini muffin pans. After I had put a dollop in each one, I went back with the back of the spoon and spread the chocolate around the bottom of the cup and up the sides. Be sure to get the chocolate up the sides as far as you can. When all of the paper cups in the pan are evenly spread, place the pan in the fridge to set up until firm, about 30 minutes. Keep the remaining chocolate over the simmering water to stay melted until you need it for the top coating. Turn the heat back on under the water, if needed, to return it to a simmer, to keep the chocolate melted.
While the chocolate is in the fridge, you can make your filling. In a mixer, combine the peanut butter, powdered sugar and vanilla. Use the lower quantity of powdered sugar to start and decide if you want to add more to firm it up. 
When the chocolate cups are firmed up, remove them from the fridge, and fill them with the peanut butter filling by the spoonful until they are about 2/3 to 3/4 full. You can spray a little cooking spray on the back of your spoon or even on your clean fingers to pat the peanut butter down evenly into the cups. You want it as flat as possible so that the chocolate coating on top will sit evenly.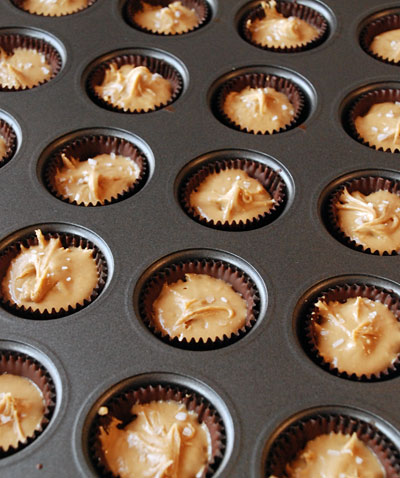
Now sprinkle a few large crunchy crystals of sea salt over the top of the peanut butter filling in each cup. This is really crucial to the flavor, so don't skip this step!
To finish, spoon more melted chocolate over the filling to cover them evenly up to the top. Sprinkle with peanuts. Return to the fridge until set up completely before packaging. Store in the refrigerator. You can remove them from the fridge a few minutes before eating, if you prefer them a little softer.
Yield: approximately 72 cups
Adapted from David Lebovitz.
